What Is the Main Function of Motor Oil: Honest Review
If you’re searching for what is the main function of motor oil, lubrication is the answer. Motor oil forms a controlled film that separates moving metal surfaces. It carries loads while reducing friction, heat, and wear.
The right amount must also reach every required part under sufficient pressure.
The SAE J300 viscosity standard defines cold and hot limits for grades such as 0W-20 and 5W-30. Those numbers describe flow, not deposit control or emissions compatibility. The owner’s manual combines those requirements, which is where accurate oil selection begins.
What Is the Main Function of Motor Oil
Quick Answer
The main function of motor oil is lubrication. It forms a film between moving engine parts. The film carries loads and reduces friction.
It also limits heat, wear, and metal contact. Correct viscosity, quantity, and pressure keep it working.
Why Accurate Motor-Oil Advice Protects Your Engine
Wrong motor oil can look normal while providing poor protection. Its problems may appear as noise, leaks, warning lights, deposits, or rising oil consumption. Serious damage can develop before the oil looks obviously bad.
Manufacturers specify oil because engines differ in clearances, bearing designs, loads, and temperatures. Their emissions systems also place different limits on sulfur, phosphorus, and ash. A formula that suits one engine can be unsuitable for another.
| Specification | What it controls | Risk of choosing poorly |
|---|---|---|
| SAE viscosity grade | Cold and hot flow behavior | Slow startup, weak hot film, or excess drag |
| Performance category | Deposits, oxidation, wear, and compatibility | Sludge, varnish, wear, or aftertreatment damage |
| Manufacturer approval | Suitability for a specific engine design | Incorrect material or emissions-system compatibility |
| Oil capacity | Quantity required by the engine | Starvation from low oil or aeration from overfill |
Viscosity is only one part of the specification. It tells you how the oil resists flow under defined test conditions. It does not tell you whether the additives can handle deposits, corrosion, or extended heat.
A lower-viscosity oil may flow more easily during a cold start. A higher-viscosity oil may stay stronger when the engine is hot. The manufacturer chooses a grade that balances both demands.
An oil can meet the right SAE grade and still fail the required performance category. It might flow correctly but provide weak detergent, antiwear, or seal compatibility. That’s why viscosity alone is never a complete answer.
As of 2026, common gasoline references include API SP and API SQ. ILSAC GF-6A and ACEA oil sequences serve other vehicles and markets. The owner’s manual decides which specification applies.
The API Engine Oil Specification categorizes engine oils through defined laboratory and engine tests. Those tests address oxidation, deposits, wear, and compatibility. They don’t override a separate manufacturer approval.
Failure of the oil film can lead to scuffing, bearing wipe, pitting, or seizure. Camshafts, piston rings, timing-chain guides, and turbocharger bearings may also suffer. The outcome depends on pressure loss, load, speed, and time.
A low reading at the dipstick is a clear warning. A normal reading doesn’t rule out a failed pump, a weak oil film, or an oil that’s too thin when hot. Accurate selection is the first layer of protection.
Correct circulation and maintenance complete it.
A hybrid with an internal-combustion engine still needs the specified engine oil. A battery-electric vehicle doesn’t need engine oil because it has no combustion engine. Its gearboxes and bearings may still require other specified lubricants.
How the Oil Film Reduces Friction, Heat, and Metal Wear
Even smooth-looking metal contains microscopic peaks, valleys, and irregularities. Motor oil fills and separates many of these rough areas. Pressure within the film then carries part of the load before metal touches metal.
A healthy oil film supports rotating shafts, sliding contacts, and heavily loaded bearings. It also carries heat away from concentrated contact zones. When the film thins, microscopic metal contact creates friction, heat, and wear particles.
The engine isn’t designed to be frictionless. It’s designed to prevent direct contact where a fluid film should form. When a full film can’t develop, controlled surface contact and antiwear additives provide a backup layer.
How does a bearing oil film form?
At a crankshaft bearing, oil enters a narrowing clearance. The turning journal draws the fluid forward and creates a pressure wedge. This process is called hydrodynamic lubrication.
The pump supplies the flow. The bearing geometry creates the wedge. Oil pressure then supports part of the journal load without direct metal contact.
Film thickness depends on several factors. Higher viscosity generally supports a thicker film at the same temperature. Greater shaft speed can also strengthen the wedge.
| Factor | What changes when it increases | Likely lubrication effect |
|---|---|---|
| Oil viscosity | Oil resists thinning under load | A thicker separating film |
| Shaft or cam speed | Surface speed rises | A stronger hydrodynamic wedge |
| Bearing clearance | The space between surfaces changes | Film formation shifts with geometry |
| Oil temperature | Viscosity falls as heat rises | The hot film becomes thinner |
| Contamination | Particles enter contact zones | Filter capacity and surface protection face greater demand |
Which lubrication regimes occur in an engine?
An engine may pass through several lubrication regimes as speed, load, and temperature change. The required additive package supports each transition.
| Lubrication regime | Common location | How it works |
|---|---|---|
| Hydrodynamic | Fast-turning journals | Pressurized oil fully separates the surfaces |
| Elastohydrodynamic | Loaded rolling contacts | Elastic surface deformation and pressurized oil support the contact |
| Mixed | Cold starts and low speed | A fluid film carries load while some microscopic contact remains |
| Boundary | Extreme contact or brief startup contact | Additives form a thin protective surface layer |
Hydrodynamic lubrication normally gives the greatest separation. A rotating journal builds enough pressure in the oil to keep the bearing surface apart.
Elastohydrodynamic lubrication occurs where heavy rolling contact can slightly deform the metal surfaces. Timing-chain rollers and some high-load contacts may briefly use this regime. The oil must remain strong under pressure without failing to flow.
Mixed lubrication is common during startup and low-speed operation. Part of the load passes through the oil film. Small areas may still make microscopic contact.
Boundary lubrication is the final layer of protection during extreme or brief contact. Antiwear additives form a chemical layer that limits scoring and metal transfer. The additive sacrifices itself so the base metal doesn’t bond.
How does viscosity affect film thickness?
Viscosity is oil’s resistance to flow. At a fixed temperature, a higher-viscosity oil generally forms a thicker film. That extra thickness can carry more load before the surfaces approach each other.
Oil viscosity falls as temperature rises. A hot engine therefore creates a thinner film than the same oil would create when cold. Fuel dilution can thin the oil further.
A hot oil film that becomes too weak increases metal contact. Friction and local temperature then rise. That extra heat can accelerate oxidation and wear.
Oil that is too viscous when cold creates a different problem. The pump may take longer to build pressure. Bearings may receive less oil during the first moments of a cold start.
A multigrade oil such as 5W-30 remains usable across a wide temperature range. Its 5W portion covers cold-start behavior. Its 30 portion defines hot kinematic viscosity near 100°C.
The balance matters more than the number alone. A thinner grade isn’t automatically better for fuel economy. A thicker grade isn’t automatically safer under heavy load.
Why does friction reduction matter?
Lower friction reduces energy lost inside the engine. Less energy becomes heat, which lowers lubricant temperature and thermal stress. It also reduces the chance of contact surfaces smearing or welding.
Oil also carries loose particles away from loaded contacts. A healthy filter captures much of that material. If pressure collapses, those particles can pass through bearings again.
A worn pump or blocked pickup can reduce flow to a specific component. The sump may still contain a full charge of oil. The engine can’t protect itself with oil that fails to circulate.
A healthy oil film is not simply a deep pool in the sump. The right fluid must reach every required surface with enough viscosity, pressure, and flow.
Motor Oil’s Secondary Jobs: Cooling, Cleaning, Sealing, and Corrosion Protection
Lubrication is motor oil’s main job, but its fluid behavior and additives provide several supporting functions. Oil transfers heat, suspends contaminants, conditions compatible seals, and limits corrosion.
These jobs support the primary film. None can compensate for the wrong viscosity, inadequate pressure, or a contaminated engine.
| Secondary function | How oil performs it | Why it matters |
|---|---|---|
| Heat transfer | Carries heat to the sump or oil cooler | Controls lubricant temperature |
| Deposit control | Detergents neutralize oxidation products | Limits sludge and varnish |
| Dispersal | Dispersants keep particles separated | Helps the filter capture contaminants |
| Seal compatibility | Conditions approved seal materials | Reduces minor seepage |
| Corrosion protection | Deposits inhibitors on metal surfaces | Limits rust during idle or storage |
| Foam control | Suppresses persistent bubbles | Maintains stable pump flow |
Does motor oil cool the engine?
Yes, within limits. Oil removes heat from bearings, camshafts, and some piston-cooling passages. That heat moves into the sump and, where fitted, an oil cooler.
Oil doesn’t replace coolant. The cooling system removes heat from the engine block, cylinder head, and other major hot surfaces. Engine oil handles a smaller and more targeted set of heat loads.
Some engines use an oil-to-coolant heat exchanger. A fan or water pump may move coolant through it. This can warm oil during warm-up or help cool it later.
Piston cooling may combine oil jets with internal coolant passages. The exact arrangement depends on the engine. Oil flow must meet the manufacturer’s design, so removing an auxiliary circuit can cause damage.
Overheating can weaken the oil film. Higher temperature reduces viscosity and speeds oxidation. A cooling-system fault can therefore shorten oil life even when the oil was fresh.
How does motor oil control deposits?
Combustion creates small amounts of fuel, water, carbon, and acidic products. Some naturally enter the crankcase during normal operation.
Detergents neutralize oil-soluble acids and oxidation products. Dispersants help keep insoluble soot and carbon particles separated. The oil filter then captures much of the resulting debris.
Neither function makes contaminated oil harmless. A heavily loaded filter can reduce flow. Large deposits can also form inside an engine if the oil’s condition has already declined.
| Contaminant | Common source | Possible effect |
|---|---|---|
| Water | Condensation, coolant leakage, or combustion | Corrosion, additive loss, and emulsion |
| Fuel | Worn rings, injector faults, or short-trip operation | Reduced viscosity and increased deposit risk |
| Soot | Diesel combustion or emissions-system faults | High viscosity and filter loading |
| Coolant | Head gasket, radiator, or cooling-system failure | Rapid additive depletion and corrosion |
| Metal particles | Normal wear or internal component failure | Bearing, gear, or surface damage |
| Glass or plastic fragments | Component breakage or filter failure | Flow restriction and circulating debris |
Can motor oil protect seals?
Yes, when the seal material is compatible with the formulation. Oil conditions elastomer surfaces and helps maintain their flexibility. That can reduce minor seepage through a lightly worn seal.
Seal compatibility is not a repair method. Oil designed to swell an incompatible seal may hide a leak temporarily. It can also damage a replacement seal later.
Use the specified formulation and the correct seal material. A stronger leak with one oil can confirm a compatibility issue. It can also point to an already damaged seal or gasket.
Some seepage around a filter housing or dipstick tube can be minor. A growing puddle, repeated low-level warning, or fast loss needs repair. Oil level monitoring remains useful even with a healthy sealing system.
How does oil prevent corrosion?
Moisture can collect inside an engine after shutdown. Repeated short trips may prevent enough heat and airflow to evaporate it. Rust can then form on cylinder walls, camshafts, bearings, and other steel surfaces.
Corrosion-inhibiting additives form a protective chemical layer on metal. They are especially useful during idle operation, moisture exposure, and long storage.
Protective additives can’t replace ventilation or correct maintenance. A blocked positive crankcase ventilation system can also contribute to pressure, leakage, and oil-consumption problems.
How Oil Moves Through the Engine’s Lubrication System
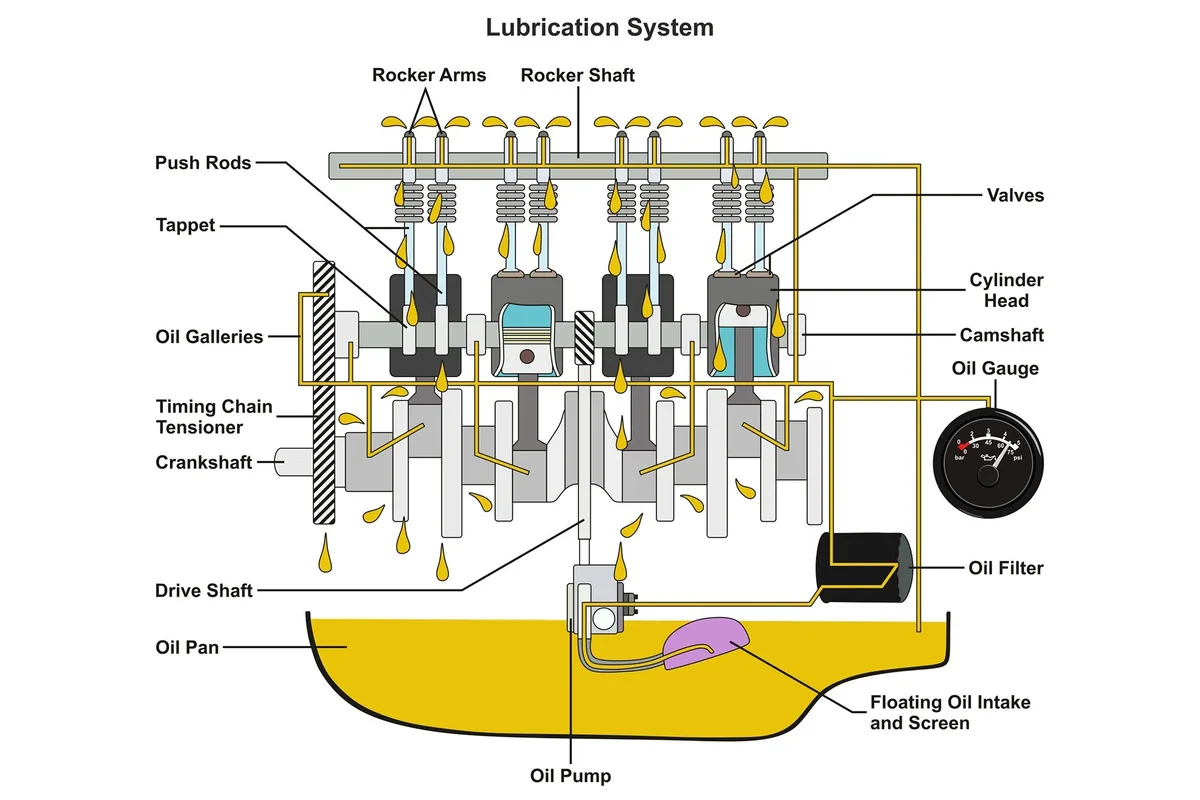
Motor oil can’t protect an engine unless the pump, filter, passages, and return route move it correctly. The sump stores the supply. The pump creates flow.
The engine’s bearings and other parts consume the oil under pressure.
A dipstick measures stored oil, not active pressure. A full sump can still suffer starvation if a pickup, pump, filter, or gallery fails.
What is the normal oil-flow path?
Most engines use a similar sequence:
- The sump collects returning oil. Gravity brings circulated oil back to the pan or reservoir.
- The pickup captures the supply. Its inlet draws oil from the bottom of the sump.
- The pump creates flow. A gear, rotor, or vane design moves oil toward the main gallery.
- The filter removes debris. Its porous element traps suspended particles.
- The main gallery distributes oil. Branch passages feed bearings, the camshaft, and auxiliary circuits.
- Control valves manage pressure. Relief and regulating valves prevent excessive pressure and wasted flow.
- Oil returns to storage. Gravity completes the circuit if the return path remains open.
The exact route varies between engines. Some engines place the pump inside the sump. Others use a remote reservoir, external pump, or dry-sump arrangement.
What does each component do?
The oil pump supplies the volume needed by the engine. Its internal leakage increases as wear develops, which can reduce pressure and flow.
The pickup must keep air out while drawing oil into the pump. A cracked fitting, damaged screen, or trapped debris can restrict the supply.
The oil filter traps particles from the circulating oil. When restriction becomes high, its bypass valve opens. The engine keeps receiving some oil, though overall protection may fall.
Relief valves limit maximum system pressure. A stuck-open relief valve can send much of the pump’s flow back to the sump. A stuck-closed valve can create excessive pressure.
Pressure-regulating valves can isolate or vary flow to particular circuits. Some newer engines adjust oil pressure and volume with engine speed, temperature, and load.
Pressure senders measure pressure and report it to the instrument panel or control module. The sender monitors the system. It doesn’t create pressure or control oil flow.
Why does oil pressure change?
Pressure depends on pump output, oil viscosity, engine speed, temperature, and restriction. A warm engine commonly shows lower pressure than a cold engine at the same speed.
A faster-running pump usually moves more oil per minute. That can raise pressure until a regulating or relief valve limits the flow.
| System condition | Likely effect | Typical warning sign |
|---|---|---|
| Correct pressure and flow | Strong film at required surfaces | Normal gauge or warning-light behavior |
| Low oil level | Pump may lose suction or supply | Low-level or pressure warning |
| Worn pump | Reduced flow, especially at speed | Falling or unstable pressure |
| Blocked pickup | Very little oil reaches the pump | Low pressure shortly after startup |
| Collapsed filter | Restricted flow after the filter | Pressure changes during warm-up |
| Open relief valve | Flow returns to the sump | Low or limited maximum pressure |
| Aerated oil | Pump cannot separate and move oil efficiently | Foam, leaks, or unstable pressure |
| Faulty sender | Incorrect electrical signal | Warning without a matching pressure loss |
Aeration can result from a low level, overfill, foaming, or a poorly sealed pickup. The pump may still turn while losing much of its ability to generate pressure. Foam can also pass seals and resemble a new leak.
There is no dependable universal pressure range. A light-duty engine and a heavy diesel use different systems. A meaningful test needs the manufacturer’s pressure value, speed, oil temperature, and test location.
Why do some engines use several oil circuits?
Many engines use staged circulation. High-flow circuits feed main bearings during startup. Lower-flow circuits can serve components that need less flow.
Auxiliary pumps may feed a turbocharger, piston cooling system, cam phaser, or cylinder-deactivation mechanism. Some turbochargers receive a separate oil supply during shutdown to reduce bearing windage.
Removing an auxiliary line can disable a feature or starve a component. A normal main-gallery reading doesn’t prove every secondary circuit works.
A dry-sump engine stores oil outside the crankcase. A separate return network brings drained oil back to the reservoir. Leaks become especially serious because oil can leave through several return and case joints.
A drain-and-refill restores the oil charge. It can’t repair a failed pump, collapsed filter, damaged pickup, or blocked internal passage.
Viscosity, Additives, and Performance Specifications Explained
Motor oil specifications work in layers. Viscosity controls flow. Additives handle chemical wear, deposits, corrosion, and seal compatibility.
The performance category confirms that the formula passed a defined test program.
An oil that meets one layer can still fail another. Two products carrying the same SAE grade can have very different additive packages.
What do the viscosity numbers mean?
The first number gives a cold-crank limit. The second gives a hot kinematic-viscosity range. The W marks a multigrade oil designed to remain fluid in cold conditions.
For example, 5W-30 meets a 5W cold-start grade. Its hot grade falls within the viscosity range defined for 30W oil at 100°C.
The W doesn’t identify the base-oil type. A conventional, synthetic, or synthetic-blend oil can carry a multigrade SAE designation.
| SAE example | Cold behavior | Hot behavior | Minimum HTHS viscosity |
|---|---|---|---|
| 0W-16 | 0W | 16W | 2.3 mPa·s |
| 0W-20 or 5W-20 | 0W or 5W | 20W | 2.6 mPa·s |
| 0W-30 or 5W-30 | 0W or 5W | 30W | 2.9 mPa·s |
| 0W-40 or 5W-40 | 0W or 5W | 40W | 3.5 mPa·s |
High-temperature, high-shear viscosity measures resistance to thinning under hot, loaded conditions. It reflects bearing clearances more closely than a standard 40°C viscosity measurement.
HTHS viscosity does not show oil temperature. It also doesn’t indicate how much oil the engine consumed or what performance category the formula meets.
SAE J300 sets both hot and cold requirements. Manufacturers then approve particular viscosities for their engine designs. Meeting a grade alone doesn’t meet the whole factory specification.
What does each additive do?
Each additive protects against a different stress. A balanced package supports lubrication while controlling deposits, oxidation, corrosion, and foam.
| Additive function | Main purpose | What can happen without enough protection |
|---|---|---|
| Antiwear agents | Protect contacting metal surfaces | Scoring, scuffing, and early wear |
| Extreme-pressure agents | Support heavily loaded contacts | Film failure and surface damage |
| Detergents | Neutralize oxidation products and acids | Sludge, varnish, and sticky deposits |
| Dispersants | Keep particles separated | Filter blockage and larger deposits |
| Antioxidants | Slow thermal breakdown | Faster viscosity loss and deposit formation |
| Corrosion inhibitors | Protect idle and stored metal | Rust and bearing corrosion |
| Foaming control agents | Limit persistent bubbles | Reduced effective flow and pressure |
| Seal conditioners | Maintain compatible elastomers | Seepage or premature seal deterioration |
| Viscosity modifiers | Preserve multigrade performance | Wider viscosity change with temperature |
Zinc dialkyldithiophosphate, commonly called ZDDP, is a traditional antiwear additive. Some emissions-sensitive specifications limit phosphorus because exhaust-borne phosphorus can damage catalysts.
Low-SAPS formulas control sulfated ash, phosphorus, and sulfur. They help protect certain gasoline aftertreatment systems. Low doesn’t mean poor quality.
It means a controlled additive chemistry for a defined application.
A separate oil additive cannot reliably replace a depleted factory package. A thickener can weaken a hot film. A flushing product can loosen deposits and send them into restricted passages.
What is a performance category?
A performance category confirms that an oil met defined tests. The tests address engine conditions that viscosity alone can’t measure.
The American Petroleum Institute publishes gasoline and diesel categories. The International Lubricant Specification and Certification Committee publishes ILSAC categories. The European Automobile Manufacturers’ Association publishes ACEA oil sequences.
As of 2026, API SP and API SQ are current gasoline references. API describes SQ as backward compatible with earlier gasoline categories. A manufacturer’s separate approval still takes priority.
Diesel engines may require API CK-4, FA-4, or another category. An FA-4 formula has specific viscosity and fuel-efficiency limits. It isn’t automatically interchangeable with every CK-4 application.
JASOC categories are common in some Japanese markets. ACEA sequences are common in Europe. A familiar viscosity can’t move an oil from one approval system to another.
How should you read an oil label?
Read the performance category and any manufacturer approval first. Then confirm that the SAE viscosity matches the owner’s manual.
Words such as premium, advanced, or energy conserving aren’t specifications. Container color and base-oil claims also don’t establish compatibility.
A useful label gives you:
- The exact SAE viscosity grade
- The required performance category
- Any manufacturer approval mark
- The oil quantity or change interval
- Relevant safety and handling information
The lowest price doesn’t protect an engine if the formula is wrong. The highest grade also fails when the manufacturer didn’t approve it.
Choosing the Right Oil for Your Specific Engine
The right oil must meet your engine’s full factory specification. That includes viscosity, performance category, manufacturer approval, and the specified capacity.
The familiar model name may not identify the exact engine. Different model years, trims, and markets can use different engines or emissions systems.
Where should you find the exact specification?
Start with the owner’s manual for the vehicle’s model year and market. Confirm the engine code before choosing an alternative performance category.
Use this order:
- Confirm the model year, trim, fuel type, and market.
- Identify the engine code or engine family.
- Find the required viscosity in the owner’s manual.
- Confirm the performance category and approval.
- Check the oil capacity and filter part number.
- Record the normal and severe-service intervals.
A VIN can help identify production details. It doesn’t always capture midyear calibration changes. A dealer or service center can confirm uncertain engine versions through manufacturer records.
| Information source | What it can confirm | What may remain uncertain |
|---|---|---|
| Owner’s manual | Oil, capacity, filter, and interval | Current oil condition |
| Engine-bay label | Engine code or displacement | Regional specification differences |
| VIN and build record | Production date and engine family | Every installed component |
| Service records | Previous oil and repairs | An incorrect earlier selection |
| Manufacturer service information | Updates and technical decisions | A used engine’s current condition |
How do market differences affect the choice?
North American engines often reference SAE viscosity with API or ILSAC performance. European engines commonly use ACEA sequences and manufacturer approvals.
Regional versions can differ in catalysts, particulate filters, turbochargers, and calibration. Those changes can alter the required viscosity or additive limits.
A turbocharged gasoline engine may require a specific approval for its bearings and hot sump. A gasoline engine with a sensitive particulate filter may require low-SAPS oil. A diesel may need a controlled ash level for its diesel particulate filter.
Don’t select oil from the body style or vehicle badge. Know the engine code first. Then use the specification tied to that version.
What if the manual allows several viscosities?
Use the manual’s first choice unless conditions exceed its stated limits. An alternative grade is valid only within the temperature or driving range the manufacturer allows.
If the manual normally calls for 0W-20, don’t use 0W-30 in hot weather unless that alternative is permitted. The hot film may become too thin for the engine’s bearing clearances.
If the manual permits 5W-30 during extreme cold, follow its conditions. A 0W grade may provide better pumpability in severe cold, but the manufacturer may have selected 0W for normal climates and efficiency.
A 0W oil is not automatically better in cold weather. A 5W oil is not automatically better in heat. The multigrade range and engine design determine performance.
What if the manual is missing?
Check the VIN plate, engine-bay label, service records, and manufacturer database. An authorized dealer or qualified technician can identify the specification.
Treat unknown oil as a service issue, not a convenient top-up. A similar viscosity can still have the wrong performance category.
A planned oil change with a full, known specification is safer than mixing several unidentified products. Record what was added and when.
Which lookalike fluids should never be used?
Don’t use automatic transmission fluid, manual-transmission fluid, gear oil, coolant, brake fluid, or general hydraulic fluid as engine oil.
Two-stroke oil isn’t a substitute for automotive engine oil. It may contain additives and base oils intended for a completely different engine design.
Diesel passenger-car oil and gasoline engine oil may both carry a 5W-30 grade. They can still differ in detergent, sulfur, ash, and antiwear performance.
If the container lacks a readable specification, set it aside. When in doubt, a delay is safer than an incompatible oil film.
Driving Conditions That Put Extra Demand on Motor Oil
Severe service places extra heat, load, contamination, or moisture on the oil and filter. Manufacturers define severe service differently, so use the definition and interval in the owner’s manual.
| Driving condition | Main effect | Practical response |
|---|---|---|
| Repeated cold starts | Slow pump flow and condensation | Use the approved cold viscosity |
| Frequent short trips | Fuel dilution and retained moisture | Follow the time-based interval |
| Heavy towing or full-load driving | Higher bearing load and oil temperature | Use the severe-service schedule |
| Sustained high speed | High bulk oil temperature | Check level and cooling warnings |
| Extended idling | Fuel dilution and reduced airflow | Avoid unnecessary warm-idling |
| Severe dust | More combustion and wear debris | Inspect air and oil filters |
| High ambient heat | Lower viscosity and faster oxidation | Check level and cooling condition |
| Low-speed towing or climbing | High load with limited airflow | Follow load and oil limits |
| Diesel exhaust recirculation use | Greater soot loading | Use the required category and interval |
How do frequent short trips affect oil?
Short trips can be harder on oil than steady highway driving. The engine may warm enough to run but stop before moisture leaves the crankcase.
Fuel can wash past piston rings during repeated starts and low-speed operation. Heat and load can increase that loss. The result may be fuel odor, reduced oil viscosity, and faster additive depletion.
A strong fuel smell at the dipstick deserves attention. A used-oil analysis can confirm fuel dilution. Small amounts during cold weather may differ from a serious ring, injector, or fuel-system fault.
Why is extended idling hard on oil?
An idling engine receives little cooling airflow. Fuel can also accumulate in the cylinder oil during repeated starts and stops. The injector wash action may not remove all of it.
A worn injector, leaking seal, stuck piston ring, or incorrect fuel pressure can increase dilution. Don’t use extended idling to warm the engine when the manufacturer calls for a different warm-up procedure.
Drive long enough to reach normal operating temperature when conditions allow. This supports moisture evaporation and helps burn small amounts of fuel entering the oil.
Does climate change the oil choice?
Cold climates increase the demand for pumpability at startup. A vehicle parked outside may lose pressure more slowly at very low temperatures.
The approved viscosity already accounts for normal climate use. Don’t choose a thinner grade without permission. Don’t choose a much heavier grade just because the engine is exposed to cold.
Hot climates raise oil and component temperatures. Check the level more closely during long trips or heavy loads. A cooling fault can also overheat oil through a shared heat exchanger.
How should you adjust your maintenance?
Keep the exact oil specification. Use the severe-service interval when your driving matches the manual’s definition.
If the manual gives both time and distance, use the first limit reached. A vehicle that rarely drives may age its oil faster than its odometer suggests.
An onboard oil-life monitor can adjust timing for certain conditions. It uses estimated operating data, not a direct test of the oil.
A low-level warning, heavy consumption event, or coolant leak should override the calculated life remaining. Fresh information about the engine matters more than the previous service calculation.
Signs of Low, Degraded, Contaminated, or Wrong Motor Oil
The most useful warning signs include a falling level, visible leaks, unusual consumption, warning lights, and a sudden change in oil condition. Appearance alone can’t verify viscosity or additive condition.
Check the level under the conditions stated in the manual. Then inspect the oil, the surrounding engine bay, and the space beneath the vehicle.
What can a dipstick reveal?
A dipstick can reveal an obvious low level, overfill, or condition change. It can’t identify the performance category or confirm that the oil has the correct approval.
Check the level with the engine off and on level ground unless the manufacturer says otherwise. Wait the specified time for the oil to drain back into the sump.
Pull the dipstick, wipe it clean, reinsert it fully, and withdraw it again. Some engines require a slightly different depth or timed procedure.
| Observation | Possible meaning | Sensible response |
|---|---|---|
| Near MIN | Leak, high consumption, or missed service | Add the specified oil and investigate the loss |
| Above MAX | Overfill or incorrect dipstick depth | Recheck and correct the quantity |
| Thick and sticky | Water, fuel dilution, oxidation, or wrong fluid | Inspect and test the oil |
| Milky residue | Coolant entering the crankcase | Stop and check the cooling system |
| Metallic particles | Bearing or other internal wear | Stop before further operation |
| Strong fuel odor | Fuel dilution or cylinder leakage | Measure consumption and investigate |
| Fresh oil at the filter | Drainback or a loose filter gasket | Clean and monitor the level |
| Oil around the cover | Gasket, seal, or ventilation-related seepage | Trace the source and check the level |
Oil can cling to the dipstick handle or tube and create a false reading. A loose dipstick can make the sump look fuller than it is. Check the tube and stick before adding oil.
A level that falls quickly deserves more attention than a small variation. Record the mileagebetween checks and the amount added. A falling level can point to an external leak, oil burning, or an incorrect dipstick reading.
Inspect the engine bay and the space beneath the vehicle before topping up.
Is dark oil always a problem?
No. Gradual darkening is normal as oil collects combustion products and oxidation byproducts. Fresh oil commonly starts amber, gold, or brown, then becomes darker with use.
A sudden change is more concerning. Fresh oil can darken quickly after a coolant leak, fuel dilution, heavy soot loading, or a cooling-system failure. Check the oil level, odor, texture, and service history together.
Color alone doesn’t identify viscosity, wear protection, or engine suitability. A dark sample can still be wrong for the engine. A clean-looking sample can still contain metal or coolant.
If the oil darkens soon after a change, find the cause before adding another product. A second oil change won’t fix an active leak or contaminated combustion chamber.
What can used-oil analysis reveal?
Used-oil analysis can measure several changes that a dipstick cannot detect. It may report viscosity, fuel dilution, coolant markers, soot, wear metals, water, and acid-related indicators.
| Result | What it may indicate | Why it matters |
|---|---|---|
| Viscosity below the expected range | Fuel dilution, incorrect oil, or severe shear loss | The hot film may become too thin |
| Viscosity above the expected range | Oxidation, evaporation, or contamination | Pumpability and deposit control may decline |
| Fuel dilution | Short trips, injector faults, ring wear, or fuel-system problems | Increased wear and possible fire risk |
| Coolant markers | Head gasket, radiator, or cooling-system leakage | Additives can be stripped from the oil quickly |
| High iron or other wear metals | Bearing, gear, or other internal contact | Possible engine damage |
| High soot | Diesel operation, EGR issues, or DPF problems | Filter loading and unsuitable viscosity |
| Elevated acidity or depleted base reserve | Oxidation, water, fuel, or soot contamination | Corrosion and deposit risk rise |
A sample can clarify why oil is dark, thin, or disappearing. It can also show that a visible leak is only part of a larger problem.
The sampling point matters. Oil drained from beneath the filter may not represent the sump evenly. Ask how the sample was taken and when it was collected.
One abnormal result needs context. Very high wear metals, confirmed coolant, or heavy fuel dilution deserve prompt investigation. A small isolated deviation may reflect local driving or laboratory variation.
Analysis doesn’t replace a pressure test or a compression test. It adds evidence to a mechanical diagnosis.
Which signs mean stop driving?
Stop driving when lubrication may be unreliable. A red oil-pressure warning, a nearly empty sump, milky sludge, or metal fragments are strong reasons to shut down.
A large external leak can become dry between checks. Blue smoke and a rapid fall in oil level may mean oil is entering the combustion chamber. Fire risk rises when fuel heavily dilutes the oil.
Check the owner’s manual for the vehicle’s warning symbols. Colors and messages can differ between models.
Low Oil Pressure and Other Warning Lights: What to Do
A red oil-pressure warning means stop driving as soon as you can do so safely. The engine may not have enough oil at its bearings. Continuing at speed can turn a leak, pump fault, or oil-consumption problem into bearing damage.
An amber low-oil message is usually less urgent, but it still needs attention. A service message means the calculated oil-life interval has ended. It doesn’t necessarily mean the engine has no oil left.
What should you do when the oil-pressure warning appears?
Pull over safely and switch off the engine. Don’t continue driving to see whether the light disappears.
- Move the vehicle to a safe location.
- Stop the engine and switch off the ignition.
- Wait long enough for hot parts to become safer to handle.
- Check the dipstick using the manufacturer’s procedure.
- Confirm the oil level and specification.
- Add oil only if the level is low and the oil is correct.
- Arrange inspection if the warning returns or the level is normal.
If the level is normal, don’t assume the warning is false. The pump, pickup, filter, relief valve, pressure sender, or oil viscosity may be at fault.
If the engine has run dry, don’t restart it several times to test the warning. Each restart can create another period without adequate lubrication. Towing is usually safer.
What do the common oil warnings mean?
The symbols differ between vehicles, but their general meaning stays consistent.
| Warning or message | Usual meaning | Immediate response |
|---|---|---|
| Red oil-can pressure symbol | Actual or suspected low oil pressure | Stop safely and check before further driving |
| Amber low-oil symbol | Oil level is below the required range | Check the dipstick and add the specified oil |
| Oil-life service message | Calculated service interval has ended | Change the oil and filter, then reset the message |
| Oil-temperature symbol | Lubricant temperature is excessive | Stop safely and inspect cooling and circulation |
| Engine-temperature warning | Coolant temperature is excessive | Stop to prevent engine damage |
| Check-engine light | A stored fault exists | Read and diagnose the code instead of clearing it repeatedly |
Some vehicles reduce engine power when pressure falls. Others disable features or shut down the engine. The owner’s manual explains the exact response.
An oil-life message is not a pressure warning. It estimates when service is due. A low-pressure warning indicates that lubrication may already be inadequate.
How is a low-pressure fault diagnosed?
Diagnosis starts with the oil level and condition. A technician checks for external leaks, contamination, fuel dilution, and evidence of metal in the oil.
The next step is a pressure test. It must use the manufacturer’s specified engine speed, oil temperature, and test location. A pressure value taken under different conditions can’t be compared fairly.
| Diagnostic check | What it reveals | Typical fault found |
|---|---|---|
| Dipstick or electronic level check | Stored oil quantity | Leak, consumption, or wrong level procedure |
| Oil condition inspection | Fuel, coolant, air, soot, or metal | Contamination or internal wear |
| Mechanical pressure test | Actual hydraulic pressure | Pump, relief valve, or restriction fault |
| Electrical pressure-signal test | Sender and wiring performance | False warning or signal failure |
| Filter inspection | Restriction, damage, or bypass operation | Collapsed filter or blocked flow |
| Pickup inspection | Supply restriction or air entry | Damaged screen, fitting, or cracked tube |
| Gallery flow or pressure test | Local delivery problem | Blockage or damage in an oil passage |
| Leak-down or compression test | Internal oil consumption | Rings, valves, guides, or cylinder damage |
A pressure sender can fail while the pump remains healthy. Its electrical signal can also be distorted by damaged wiring or a poor ground. Testing the sender doesn’t replace a mechanical pressure test.
A pressure reading taken only at idle can miss a fault that appears at higher speed. A worn pump may create enough pressure while idling but fail to maintain flow as demand rises.
The exact pressure range belongs to the engine. A light-duty gasoline engine and a heavy-duty diesel don’t share a dependable universal limit.
Which causes require urgent attention?
A failed pump is serious because it supplies the main oil galleries. A damaged bearing can create metal debris even when a pressure reading appears normal.
| Cause group | Examples | Result |
|---|---|---|
| Insufficient supply | Low level, leak, high consumption, blocked pickup | Pump loses suction or receives too little oil |
| Pressure loss | Failed pump, worn relief valve, internal leakage | Main bearings receive inadequate flow |
| Incorrect viscosity | Wrong grade, failed oil, or fuel dilution | Oil thins at operating temperature |
| Air entrainment | Foam, overfill, pickup aeration | Pump flow and pressure become unstable |
| Restriction | Collapsed filter, debris, blocked gallery | Required components receive less oil |
| Heat damage | Leak, oil-cooler failure, or cooling fault | Viscosity falls and additives deplete |
| Electrical fault | Bad sender, wiring, or ground | Warning appears without matching pressure loss |
| Internal damage | Bearing, gear, or shaft failure | Metal debris and abrupt pressure loss can develop |
A relief valve can reduce pressure if it stays open. It can also create excessive pressure if it fails closed. A pressure-regulating fault can starve one circuit while the main gallery still looks normal.
Metal fragments in the oil deserve special attention. Bearing material can circulate through the system after a short failure. Fresh oil does not make the damaged bearing safe again.
If pressure returns after adding oil to an empty engine, the cause still needs investigation. The engine may have consumed a large amount of oil, leaked it, or run with a failed pump.
When is towing the safer choice?
Tow the vehicle if the pressure warning returns with a normal level. Also tow when the level falls rapidly, the engine has run dry, or oil is visibly leaking.
A milky oil sample, a burning smell, heavy fuel dilution, or metallic debris also calls for transport rather than another road test. A hard mechanical noise can indicate bearing or rotating-part damage.
Don’t drive a mile to a shop simply because the warning light went out. The pressure may return at the next start or under load.
If the vehicle uses a dry-sump system, don’t run it after removing the fill cap or changing the filter unless the manufacturer gives a specific procedure. The reservoir can drain through the open system in seconds.
What should happen after the repair?
Use the exact oil quantity and specification. Check the drain plug, filter housing, oil pan, valve cover, and any joint that was disturbed.
Prime the oil pump if the service procedure requires it. Then verify pressure at the manufacturer’s specified speed and temperature.
Reset the oil-life message only after the repair is complete. Clearing a code or resetting a service indicator doesn’t repair a pump, sender, or leak.
Look for fresh leakage after the first drive. A small oil trace around a filter gasket may be acceptable if it doesn’t grow. A drip that returns after wiping the area needs correction.
Keep the service record with the oil specification, pressure result, date, mileage, and parts replaced. That record helps the next technician avoid repeating the fault.
How to Check, Top Up, and Change Motor Oil Safely
A safe oil service follows the owner’s manual from start to finish. Check the level correctly, use the exact oil and filter, and keep contaminants out of the engine. A careless drain or refill can cause more trouble than the old oil did.
What tools and materials do you need?
Gather the specified parts before touching the drain plug. A small mistake in quantity or specification can affect the whole service.
| Tool or material | Purpose |
|---|---|
| Owner’s manual | Confirms oil, filter, capacity, procedure, and interval |
| Correct engine oil | Matches viscosity, performance category, and approval |
| Correct oil filter | Maintains contaminant control and flow |
| Drain pan or sealed container | Captures used oil |
| Correct drain-plug washer or seal | Prevents leakage after reassembly |
| Funnel and clean container | Reduces spills during filling |
| Wipes and absorbent material | Protects the work area and reveals leaks |
| Proper vehicle supports | Protect you if work is done underneath |
| Eye protection and gloves | Reduce contact with hot oil and contaminants |
Use the exact drain-plug fastener and tightening procedure. Some plugs use a one-time-use sealing washer. Some are torque-to-yield fasteners that require a specific installation method.
A cartridge filter may hold a significant amount of oil. Drain it into a pan before removal. A spin-on filter can also leak when its gasket is disturbed.
How do you check the level correctly?
Park on level ground and apply the parking brake. Check the engine temperature and running state required by the owner’s manual.
Many procedures require the engine to be off. Wait the stated time for the oil to settle, then pull the dipstick and wipe it clean.
Reinsert the dipstick fully or to the specified depth. Withdraw it again and read the level against MIN and MAX. Some engines require a slightly different depth or a timed shutdown.
A loose dipstick can create a false high reading. Oil on the handle or tube can also distort the result. Clean the stick and tube before making a decision.
| Engine type | Common level method | Important caution |
|---|---|---|
| Dipstick engine | Pull, wipe, reinsert, and read | Follow the manual’s temperature and depth instructions |
| Electronic oil-level system | Select the specified ignition mode and read the display | Don’t substitute a generic dipstick reading |
| Dry-sump engine | Follow the reservoir and pump-priming procedure | An open fill port can drain the system quickly |
| Hot-oil checking system | Warm the engine to the stated condition | Hot oil and moving parts can cause burns |
The dipstick measures stored oil. It doesn’t confirm that the pump is working or that the correct oil is installed. A normal level with a pressure warning still needs diagnosis.
How do you top up safely?
Add oil in small amounts. Use only the viscosity and performance category stated by the manufacturer.
- Confirm the required oil.
- Check the level under the prescribed conditions.
- Clean around the filler opening.
- Add a small initial quantity.
- Wait for the oil to settle.
- Recheck the level.
- Stop before reaching MAX.
- Secure the filler cap and clean any spill.
If the engine is nearly empty, add enough oil to reach the required range before attempting to start it. Follow the manual’s instructions for priming or starting a low-oil engine.
A top-up with compatible oil can be reasonable during normal operation. It becomes a diagnostic problem if the level falls again. Record the date, mileage, quantity, and product specification.
If the oil-pressure warning is on, don’t keep adding oil until the light goes out. A full sump won’t repair a failed pump or a blocked pickup.
How do you change the oil safely?
Use the manufacturer’s drain-and-fill procedure. The basic sequence is common, but filter style, pump priming, and drain access vary by engine.
- Confirm the oil, filter, capacity, and interval.
- Gather the correct parts and tools.
- Warm the engine only if the manual calls for it.
- Park on level ground and secure the vehicle.
- Allow hot components to cool enough to work around safely.
- Remove the filler cap if required.
- Position the drain pan beneath the sump plug.
- Remove the plug and let the oil drain fully.
- Inspect the plug and replace its specified seal.
- Remove the old filter and catch residual oil.
- Clean the filter mounting surface.
- Install the new filter in the required direction.
- Add the specified oil quantity.
- Prime the pump if required.
- Install and tighten the drain plug correctly.
- Replace the filler cap.
- Start the engine only after the oil charge is present.
- Watch pressure and temperature warnings.
- Recheck the level after the specified run or settling time.
- Inspect for fresh leaks and record the service.
Some engines use a cartridge filter inside a housing. Others use a spin-on filter. Follow the manufacturer’s instructions for removing the housing, replacing the O-ring, and checking the housing.
A new filter doesn’t require a full sump to become wet. Oil remains in the filter, galleries, cooler, and engine passages. Add the specified service quantity rather than filling to the theoretical maximum.
A dry-sump engine may need manual pump priming before the first start. The refill process can differ from a conventional wet-sump service. Never improvise that sequence.
Check the drain-plug torque. Overtightening can damage the plug or oil pan. Under-tightening can cause a leak that looks like a failed filter gasket.
After starting, watch the oil-pressure indication during the first moments. If it remains low, shut the engine down. Don’t continue the test drive.
Recheck the level at the time stated in the manual. Some engines require a short run at operating temperature before the final reading. Others call for a cold check after a timed shutdown.
Dispose of used oil and the old filter through an approved local route. Keep it away from drains, soil, and water. Used oil contains metals, fuel, and combustion products.
Safety warning: Hot oil, filters, and exhaust components can cause serious burns. Don’t work under a vehicle supported only by a jack, and don’t loosen a drain plug over an unprotected hand.
What should you do after the service?
Inspect the drain plug, filter housing, oil pan, and valve cover. A small trace near a filter gasket may be normal if it doesn’t grow.
Check the level again after the specified settling period. If the engine uses an oil-life monitor, reset it only after the correct oil and filter are installed.
Record the viscosity, performance category, manufacturer approval, quantity, date, and mileage. That record helps with warranty questions and future troubleshooting.
If the level drops quickly, inspect the new filter gasket, drain plug, sump plug, and disturbed joints. A small top-up can hide the early sign of a leak. It shouldn’t replace correcting the source.
Conventional, Synthetic, Synthetic-Blend, and Low-SAPS Oils Compared
The best oil is the one that meets the engine’s full specification. Base-oil type matters, but viscosity, performance category, and manufacturer approval come first. Synthetic doesn’t automatically mean compatible.
What are the main oil types?
Each type uses a different base-oil approach. The additive package can also differ, so the label must be read in full.
| Oil type | Base-oil approach | Common strengths | Best use |
|---|---|---|---|
| Conventional | Mineral-derived base oil | Lower cost and adequate performance where approved | Older or simpler engines that specify it |
| Fully synthetic | Chemically produced base oil | Stable viscosity, low-temperature flow, and oxidation resistance | Modern, turbocharged, hot, or high-mileage applications when approved |
| Synthetic-blend | Mixed synthetic and mineral base oils | Balanced cost and performance | Engines that permit the category and viscosity |
| Low-SAPS | Conventional, synthetic, or blended base oil with controlled additives | Compatibility with sensitive aftertreatment systems | Engines that specifically require low SAPS |
Conventional oil can be correct for an older engine. Fully synthetic oil can be correct for a newer engine. The manufacturer’s specification decides.
Low-SAPS is an additive description, not a base-oil type. A fully synthetic oil can be low-SAPS, and a conventional oil can also meet a low-SAPS specification.
Is synthetic oil better for every engine?
No. Synthetic oil usually offers more consistent viscosity and volatility control. That can be useful in cold starts, hot climates, turbochargers, and extended service intervals.
The engine still needs the correct viscosity and performance category. A synthetic oil with the wrong approval can be unsuitable. So can a conventional oil that meets every factory requirement.
High mileage isn’t an automatic reason to choose any oil labeled for high-mileage engines. Check the viscosity, category, and approval first. Then consider the seal-conditioning and detergent package.
A high-mileage formula may contain stronger seal conditioners and detergents. It may also carry a higher viscosity that suits an older engine. Those features aren’t required on every older vehicle.
When is synthetic-blend oil a sensible choice?
A synthetic blend can provide a useful balance between cost and consistency. It may be appropriate when the manufacturer approves it for the engine’s duty cycle.
It can also be a practical choice for a mixed fleet or a vehicle driven in moderate climates. The blend should still carry the required performance mark and viscosity.
Don’t choose it because the label sounds modern. Choose it because it meets the full specification and fits the service conditions.
Does low-SAPS oil protect the engine better?
Not in every sense. Low-SAPS oil is designed to limit certain substances that can harm sensitive emissions equipment. It still needs the same level of lubrication, oxidation control, and detergent performance as the engine requires.
A gasoline particulate filter can be sensitive to phosphorus carried in exhaust oil. A low-SAPS formula helps control that risk. It doesn’t excuse an oil leak or excessive oil consumption.
Low-SAPS oil is common in some newer gasoline engines. It isn’t automatically right for an older engine, a diesel, or a vehicle with no sensitive aftertreatment system.
Can a lower-viscosity oil improve fuel economy?
Sometimes. A lower approved viscosity can reduce pumping losses during warm operation. The engine calibration and oil specification must support that grade.
A thinner oil doesn’t save fuel if the engine burns it, wears, or triggers a warning. An oil that’s too thin when hot can increase friction inside the engine.
Use the manufacturer’s first-choice grade unless the manual allows an alternative. Then compare actual fuel use over similar conditions. A single tank isn’t a reliable test because traffic, temperature, tire pressure, and driving style also change consumption.
Can you mix oil brands or types?
A small top-up with another oil that meets the full specification may be acceptable. Some manufacturers permit mixing compatible products. The manual controls.
A planned change is safer with one known specification. Mixing several products makes the additive package and viscosity harder to document.
Never mix diesel oil into a gasoline engine without specific authorization. Never use a high-SAPS oil in an engine that requires low-SAPS protection. Never assume equal viscosity means equal compatibility.
If the wrong oil was added, record the product and quantity. The engine may need a complete change and a check for aeration, dilution, or filter contamination.
Which type suits an older engine?
Use the oil specified by the manufacturer, even if the engine is old. A conventional formula may meet the required category. A synthetic or high-mileage formula may also be approved.
The engine’s condition matters. Open valves, worn piston rings, and old seals can increase oil consumption or smoke. A heavier grade may reduce loss in some engines, but it can weaken the hot film and increase drag.
Have a technician identify the consumption before changing viscosity. The right oil can’t repair worn rings, guides, or a leaking gasket.
Which type suits a turbocharged engine?
Use the exact oil and approval required for that turbocharged engine. The oil must feed the main bearings and any separate turbocharger lubrication circuit.
A turbo bearing can run at high speed and high temperature. The correct oil flow, pressure, and viscosity matter more than a marketing label.
Inspect the oil feed and coolant lines if oil is present near the turbo. A coolant leak can contaminate the oil. An oil leak can reach hot exhaust parts and create a fire risk.
Which type suits a diesel engine?
Use the exact diesel performance category, viscosity, and any manufacturer approval. A gasoline oil with the same SAE grade may not provide suitable soot control or additive protection.
Low-SAPS requirements differ across diesel designs. A diesel particulate filter can be affected by ash and metals. A gasoline engine’s low-SAPS rule doesn’t automatically transfer.
Check whether the engine requires CK-4 or FA-4. Their viscosity and fuel-efficiency limits differ. Don’t substitute one for the other without manufacturer guidance.
Oil Change Intervals, Oil Consumption, and Long-Term Engine Care
Use the manufacturer’s earliest limit, not a generic mileage rule. Time, distance, operating hours, duty cycle, and the onboard oil-life estimate all matter. Fresh-looking oil can still lose additives and collect moisture.
How do you calculate an oil change interval?
Use whichever limit the owner’s manual reaches first. If it states 7,500 miles or 12 months, use the first one reached.
| Interval basis | What it protects against | Typical example |
|---|---|---|
| Time | Moisture, oxidation, and additive aging | A lightly driven car parked for months |
| Distance | Accumulated engine operation | Normal mixed driving |
| Engine hours | Use on generators or stationary equipment | Long idling with little road distance |
| Duty cycle | Heat, load, or contaminant loading | Towing, severe dust, or repeated high load |
| Oil-life monitor | Manufacturer-calculated service timing | A vehicle with computer-managed intervals |
A synthetic oil doesn’t automatically double the interval. The manual must allow it. The engine must also operate within the conditions used to set that interval.
An oil-life monitor uses estimated operating data. It may include engine runtime, temperature, starts, and distance. It doesn’t directly measure viscosity, water, metals, or remaining additives.
A sudden oil-consumption event should override the calculated life remaining. A coolant leak, worn ring, or failed turbo seal can damage an engine before the monitor reaches its service point.
How often should you check the level?
Check at the interval in the manual and whenever you notice a leak, warning, or change in engine noise. Many drivers check between scheduled services, but no universal mileage rule fits every engine.
Check more often if the engine burns oil, has a new leak, or has a long trip ahead. Extreme heat and heavy load can make a marginal level more obvious.
A short walk around the vehicle can reveal fresh oil before it reaches the minimum mark. Look beneath the oil pan, around the filter, and near the valve cover.
How do you measure oil consumption?
Record the mileage and the exact amount added. Repeat the measurement over several intervals. A sudden increase matters even if the amount remains below a general online threshold.
The owner’s manual may state a consumption limit. That limit is the reference for the engine. Some manufacturers also describe a small allowance during warm-up.
| Observation | Possible explanation | Next step |
|---|---|---|
| Small loss during warm-up | Oil reaching exhaust before rings expand | Compare with the manual’s allowance |
| Steady loss after warm-up | Guides, rings, seals, or external leak | Inspect leaks and perform internal tests |
| Sudden increase | New failure or damaged gasket | Check immediately for level and pressure |
| Loss with fuel odor | Fuel dilution or cylinder leakage | Analyze the oil and inspect fuel controls |
| Loss with smoke | Oil entering the combustion chamber | Inspect rings, guides, and valve components |
| Level falls but no visible leak | Consumption, evaporation, or hidden seepage | Use controlled measurements and inspect further |
Thicker oil can reduce loss through some worn valve guides. It can also increase drag and raise oil temperature. Don’t change viscosity without checking the specification.
A used-oil analysis can measure fuel dilution and wear metals. It can’t tell you whether a low level came from an external leak by itself. Pair it with a physical inspection.
What happens if oil burns into the combustion chamber?
Oil can enter through worn piston rings, valve guides, turbo seals, or other leak paths. Burning oil raises exhaust smoke and can leave deposits.
A small amount after a long idle may have a different cause than steady loss after warm-up. The pattern and the manufacturer’s guidance still control the diagnosis.
If the level drops quickly, stop driving and check the oil. A fuel-heavy mixture can ignite in a hot exhaust system. Don’t continue until the cause is known.
How should you store a vehicle for long periods?
Follow the storage instructions in the owner’s manual. If the oil is old or contaminated, change it before storage when the procedure calls for it.
Run the engine to full operating temperature if directed. This helps evaporate moisture and spread fresh oil across the engine. Don’t warm it by leaving it idling unless the manufacturer says so.
Protect the intake and exhaust openings as directed. Disconnect the battery according to the manual. A dry-sump system may need a separate drain or sealing step.
Before restarting, check the oil level, air filter, battery, and visible leaks. Listen for abnormal noise and watch oil pressure from the first start.
How do you extend oil and engine life?
Keep the cooling, air, fuel, and lubrication systems healthy. A clean engine produces fewer particles and burns more consistently.
- Maintain the coolant level and inspect the cooling system.
- Replace the air filter on schedule.
- Inspect the PCV system if the engine consumes oil.
- Fix external leaks before they create a low-level warning.
- Use the correct filter and drain-plug seal during service.
- Follow the severe-service interval when applicable.
- Avoid unnecessary warm idling.
- Record every oil change, top-up, and warning.
- Use used-oil analysis for a suspect or high-mileage engine.
For a rebuilt engine, use the oil and first-change interval specified by the builder or vehicle manufacturer. Don’t apply a generic break-in rule.
Should you flush the engine?
Don’t flush routinely unless a qualified technician finds a specific reason. A strong chemical flush can loosen deposits and move them into restricted passages.
A flush can’t repair a failed pump, damaged bearing, coolant leak, or torn gasket. It may also hide the evidence needed for diagnosis.
If sludge, varnish, fuel, coolant, or metal is present, identify the cause first. A proper oil-and-filter change and testing are usually safer than adding a cleaner to an unknown engine.
When to Ask a Mechanic for Help
Ask a mechanic when the symptom points beyond a normal level check. Low pressure, a repeating leak, rapid consumption, contamination, or an unknown oil specification deserves a proper diagnosis.
Early inspection is usually cheaper than replacing a damaged bearing, turbocharger, or emissions component. A warning light is a request for information, not a reason to keep testing the road.
Which signs mean you should stop immediately?
Stop the vehicle when lubrication may be unreliable. Don’t treat these signs as routine reminders.
| Warning or symptom | Why it matters | Best response |
|---|---|---|
| Red oil-pressure warning | Main bearings may lose their film | Stop safely and inspect before driving |
| Oil far below MIN | The pump may lose its supply | Add only if safe, then inspect or tow |
| Milky oil | Coolant may be stripping the oil | Stop and check the cooling system |
| Metal fragments | Internal wear may already be occurring | Stop before further operation |
| Rapid level loss | The engine may run dry between checks | Tow or repair before normal driving |
| Strong fuel odor with thin oil | Fire and wear risk may be elevated | Shut down and inspect |
| Sudden blue smoke | Oil may be entering the cylinders | Stop and assess the engine |
| Hard knocking or metallic noise | Bearing damage may be developing | Shut down and seek diagnosis |
| Overheating with an oil warning | Cooling and lubrication may both be affected | Stop safely and tow if needed |
A low-pressure warning can come from a failed sender. That still needs confirmation. Assuming it is only a sensor can leave a real mechanical problem in place.
Which symptoms deserve a prompt appointment?
Schedule an appointment when the engine runs but a problem keeps returning. Rising consumption, repeated low-level checks, visible leaks, and persistent service messages all deserve attention.
A dark or contaminated sample can wait only when the engine is operating normally. Milky sludge, fuel odor, metal debris, or a sudden pressure change should be assessed sooner.
Turbocharged and supercharged engines need careful attention. Oil near the oil feed, coolant near the turbo, rising consumption, or a burning smell can affect high-speed bearings and hot exhaust parts.
Diesel owners should watch for rising oil viscosity, high soot, exhaust smoke, a DPF warning, or rapid filter loading. These signs can point to fuel, EGR, DPF, or oil problems.
A vehicle without reliable service records also benefits from a baseline inspection. Knowing the current oil, its age, and the engine’s consumption pattern helps prevent another incorrect service.
What should a technician check?
Ask for a diagnosis based on manufacturer pressure and lubrication specifications. A generic pressure range can hide a fault or condemn a healthy pump.
| Area | Typical checks | Why it matters |
|---|---|---|
| Oil level and condition | Dipstick or electronic reading, color, odor, contamination | Finds starvation, dilution, coolant, or wear debris |
| Oil pressure | Test at specified speed and temperature | Confirms pump and pressure-circuit operation |
| Pump and relief valve | Flow, pressure, bypass, and internal leakage | Finds lost supply or pressure-control faults |
| Filter and pickup | Damage, blockage, restriction, and bypass | Finds components that starve the engine |
| Oil galleries | Flow or pressure at relevant points | Finds local delivery restrictions |
| Pressure sender | Signal, wiring, ground, and calibration | Separates electrical faults from pressure loss |
| External leaks | Pan, filter, cover, crankcase seal, and accessories | Finds common sources of falling levels |
| Internal consumption | Compression, leak-down, borescope, and exhaust inspection | Finds rings, valves, guides, or cylinder damage |
| Cooling and fuel systems | Pressure test, injector checks, and oil analysis | Finds causes of thinning or additive loss |
Ask the technician to record the pressure value and test conditions. A number without engine speed, oil temperature, and test location can’t be compared properly.
Used-oil analysis can add useful evidence. It can show fuel dilution, coolant markers, soot, viscosity change, and wear metals. A sample taken at the wrong point may not represent the sump.
What information should you bring?
Bring the owner’s manual and service records. Write down when the warning appeared, whether the engine was cold or warm, and whether pressure returned after adding oil.
Photograph the oil container, filter box, and VIN plate if the manual is missing. A clear photo of the specification can prevent a wrong refill.
If the vehicle uses a dry-sump system, tell the technician before anyone removes the fill cap or filter. An incorrect procedure can drain the system almost instantly.
Ask for the old and new oil specifications, the measured pressure, the filter part number, the final level, and the date and mileage. Keep the record with the vehicle.
When is a do-it-yourself check reasonable?
A DIY level check and careful top-up are reasonable when the engine runs normally and the manual gives clear instructions. A scheduled oil-and-filter change can also be manageable with the correct tools and a safe workspace.
DIY diagnosis isn’t enough for low pressure, metal in the oil, coolant contamination, an unknown oil, a major leak, or a dry-sump engine. Those problems need model-specific information and proper gauges.
If a shop proposes only adding thickener, clearing a code, or flushing the engine, ask what fault those actions diagnose. A warning needs a cause, not a reset. A leak needs repair, not a larger charge.
Frequently Asked Questions
Does motor oil cool the engine?
Yes, within limits. Motor oil transfers heat from bearings, camshafts, and some piston-cooling passages to the sump or an oil cooler. It doesn’t replace coolant, which handles the engine’s major cooling needs.
Overheating can thin the oil and accelerate wear, so treat an oil-temperature warning seriously.
Is thicker motor oil always better?
No. Thicker oil can support a hot film, but it may flow too slowly during a cold start and increase pumping drag. Use the viscosity and performance specification in the owner’s manual.
If the engine consumes oil, a heavier grade may hide a leak or worn component without fixing the cause.
How often should I change motor oil?
Use the interval in the owner’s manual, and follow whichever comes first: time, distance, operating hours, or a severe-service condition. An oil-life monitor is an estimate, not a direct test of oil quality. Don’t extend the interval because the oil looks clean, and don’t assume synthetic oil automatically permits a longer change.
Can I mix motor oil brands or types?
A small top-up with another oil may be acceptable if it meets the engine’s full specification and the manufacturer permits mixing. A planned change is safer with one known product. Never mix gasoline and diesel oil casually, and don’t add a high-SAPS oil to an engine that requires low-SAPS protection.
What should I do if the oil-pressure warning comes on?
Stop driving as soon as you can do so safely, then shut off the engine. Let it cool before checking the dipstick, and add the specified oil only if the level is low. If pressure doesn’t return, the warning reappears, or the level is normal, arrange inspection or towing.
Don’t keep restarting a dry engine.
Is it normal for motor oil to get dark?
Some gradual darkening is normal as oil collects combustion products and oxidation byproducts. A sudden change after a fresh change can indicate heat, fuel dilution, soot, or coolant contamination. Check the level trend, odor, texture, and service history.
A used-oil analysis can help identify the cause when the signs aren’t clear.