When Is the Best Time to Check Your Motor Oil: Easy guide
When is the best time to check your motor oil? The honest answer is to use the procedure in your exact owner’s manual. A cold dipstick check, a warm engine-off check, and a running-engine check each measure a different oil distribution.
What works on one vehicle can produce a false reading on another.
Many manuals call for about five minutes after shutdown, though some require idling during the check. SAE J300 defines viscosity grades such as 0W-20, but it does not set the reading procedure. As of 2026, the manufacturer’s procedure for the exact vehicle is the deciding factor.
Quick Answer
When is the best time to check your motor oil? Use the timing stated in your exact owner’s manual. A dipstick may need a cold or warm engine.
An electronic system may need a full warm-up cycle. Never copy another vehicle’s procedure.
Why the Timing of an Oil-Level Check Matters
Timing is part of the measurement. It isn’t just a detail that separates a cold check from a warm one.
Engine oil, also called motor oil, is moving while the engine runs. It is also draining toward the oil pan after shutdown. That movement can change what a dipstick or sensor reports.
A reading taken too soon after driving may appear lower than the settled level. A reading taken before an electronic system completes its warm-up cycle may not be valid.
Why does timing change the reading?
Timing changes the reading because oil does not remain in one place during operation.
While the engine runs, the oil pump moves oil through the filter, engine passages, bearings, and cylinder walls. Some oil is also thrown into the crankcase by moving components.
After shutdown, oil coating the upper engine begins returning to the sump. Oil inside the filter and oil passages may take longer to drain than oil already circulating below.
Pulling the dipstick during that movement can produce a falsely low result. Opening an electronic display before its calibration conditions are met can leave the reading unavailable or misleading.
What conditions make a reading useful?
A useful oil-level reading depends on four conditions:
- The oil is where the measuring system expects it to be.
- The engine is in the required state.
- Any warm-up or shutdown wait is complete.
- The dipstick or electronic procedure is followed exactly.
| Vehicle condition | What may be happening | Possible effect |
|---|---|---|
| Engine cold after a long rest | Oil has settled into the sump | Stable reading if the manufacturer allows a cold check |
| Engine warming | Oil is moving onto internal surfaces | Reading may not match the calibrated condition |
| Fully warmed engine running | Oil is circulating and may contain air | Valid only for a running-engine procedure |
| Engine off just after shutdown | Oil is still returning to the sump | Dipstick may read falsely low |
| Engine off after the required wait | Oil has reached its calibrated resting state | Usually the intended dipstick reading |
| Electronic system below its warm-up threshold | Sensor data is outside its valid range | Reading may be unavailable or inaccurate |
Oil level and oil pressure are different measurements
An oil-level reading tells you how much oil is present. An oil-pressure reading tells you whether the lubrication system maintains pressure under operating conditions.
| Measurement | What it shows | Why it matters |
|---|---|---|
| Oil level | Whether the quantity is below, within, or above the permitted range | Too little oil can lead to oil starvation |
| Oil pressure | Whether pressurized oil reaches lubricated areas | Very low pressure can cause rapid damage |
| Oil temperature | How warm the oil is | Some electronic checks require a specific temperature |
| Oil condition | Whether visible contamination or abnormal changes are present | A normal level does not prove the oil is healthy |
A low-oil warning may be based on a sensor or an estimate. A low-oil-pressure warning means the lubrication system isn’t meeting the expected pressure.
Low pressure deserves faster action. Don’t cancel it because a dipstick shows enough oil.
When does timing matter most?
Timing matters most when oil is moving or when the measuring system depends on warm engine data.
Extra care is warranted:
- Before a long trip after a missed inspection.
- After an oil change or owner top-up.
- After repeated short trips.
- When using an electronic oil-level display.
- When the engine consumes oil between services.
- After a low-oil or low-oil-pressure warning.
- When the dipstick is read immediately after driving.
Keep the conditions with the reading
Write down the date, odometer reading, and engine state. Include the shutdown wait when the procedure requires one.
A note such as “warm, engine off, six minutes after shutdown” is more useful than “oil okay.” It helps you compare later readings fairly.
How Engine Temperature and Shutdown Time Affect the Reading
Engine temperature and shutdown time affect where the oil is and whether the measuring system is ready.
The quantity of oil does not change instantly during a short drive. Its location and distribution do.
What happens while the engine is running?
The oil pump keeps oil moving through the engine. Some oil coats the cylinder walls and cylinder head before returning to the sump.
Air may also enter the oil during startup, idling, or low-speed driving. Aerated oil can behave differently inside a dipstick tube or near a level sensor.
A running-engine check is valid only when the manufacturer designed the system for that condition. The procedure may require a warmed engine, a set idle speed, and a specific moment for the reading.
What happens after you shut off the engine?
Oil continues moving toward the sump after shutdown. The oil pump stops, but gravity and residual flow don’t.
Oil trapped in the cylinder head, filter, and upper crankcase may take longer to return than oil already circulating below. Pulling the dipstick too early can therefore produce a falsely low result.
Many manuals use a wait of about five minutes. That figure is a common example, not a universal rule.
How long should you wait after turning the engine off?
Wait for the period stated in your owner’s manual. If it says five minutes, use at least five minutes. If it gives another interval, use that interval.
A dipstick is calibrated around the manufacturer’s chosen shutdown time. Waiting longer may produce a stable reading, but it doesn’t replace the specified procedure.
Use this simple rule:
- If the manual allows a cold check, read the dipstick before startup after an overnight rest.
- If it requires a warm check, run or drive the engine as directed.
- After shutdown, wait for the stated interval.
- If it requires engine operation, don’t substitute an engine-off reading.
Why do cold and warm readings differ?
Cold oil tends to collect in the sump after the vehicle rests. Warm oil has circulated through more of the engine.
Temperature also changes viscosity and the behavior of electronic sensors. Oil distribution is usually the bigger practical reason for a changing dipstick reading.
A cold reading and a hot reading may look different even though no oil has been added or lost. Compare readings taken using the same approved method.
Does a normal coolant temperature prove the oil is ready?
No. Coolant temperature and oil temperature are related, but they don’t always rise at the same rate.
The engine may reach its normal coolant range while oil is still moving through a cold engine. An electronic system may also need time after coolant stabilization.
Follow the manual’s temperature or warm-up instructions. Don’t rely only on the dashboard gauge.
Does weather change the procedure?
No. Ambient temperature can change warm-up time, but it doesn’t change the manufacturer’s measurement method.
Cold weather may make a before-start cold check convenient. Hot weather can make the oil cap, dipstick, and surrounding parts too hot to touch safely.
Use the required engine condition either way. Let the vehicle reach it naturally instead of overheating or driving hard.
What if the engine never reaches full temperature?
Use an approved cold check if the manual provides one. Otherwise, the electronic system may remain unavailable until a complete warm-up cycle occurs.
Repeated short trips can prevent full warm-up. That makes consistent records more useful because you may not see a normal hot-engine reading for weeks.
What if the level looks low after a long drive?
Don’t add oil until you’ve completed the required shutdown wait and repeated the check. A hot dipstick pull can be falsely low.
If the second reading remains low, use only the specified oil. Add it in small amounts and stop within the permitted range.
If the level falls again after a short drive, treat it as a possible leak or consumption issue. Don’t keep topping up an empty engine.
Which Oil-Check Method Does Your Vehicle Use?
Your vehicle may use a traditional engine oil dipstick, an electronic oil-level measurement system, or both.
The method determines the correct engine state. It also determines whether you need a warm-up cycle or a shutdown wait.
Traditional engine oil dipstick systems
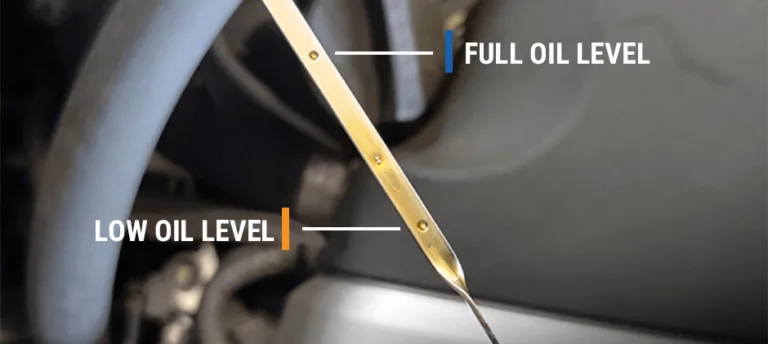
A traditional engine oil dipstick is a marked rod installed inside an oil dipstick tube. You pull it, wipe it, reinsert it fully, and read the calibrated level.
Common markings include:
- MIN and MAX
- ADD and MAX
- ADD and OK
- A permitted range with two tabs
- A full scale with a textured or shaded zone
Some dipsticks are read with the engine off. Others are intended to be read while the engine runs at a specified speed.
The shape and length of the dipstick do not tell you which method applies. Use the procedure for the exact engine.
Electronic engine oil level measurement
Electronic engine oil level measurement reports quantity through a sensor or control system. The result appears in the instrument panel or vehicle information menu.
Common displays include:
- A low or normal message
- A bar graph
- A numerical estimate
- A check-oil prompt
- An unavailable or invalid measurement message
The display may not provide the exact number of quarts or litres remaining. Its main purpose is often to warn when the oil falls below a programmed threshold.
How do direct electronic sensors work?
Direct systems use a sensor or switch near the oil sump. A change in electrical or mechanical properties tells the controller that the oil has crossed a set level.
Some systems use more than one sensor. A backup sensor may provide a basic low-level warning after a primary circuit fault.
A fixed low-level switch can’t provide a detailed consumption trend. It usually reports a specific threshold rather than every change in quantity.
How do estimated electronic systems work?
Estimated systems may combine several inputs. These can include oil temperature, engine speed, runtime, and crankcase pressure data.
The controller uses those signals to decide when a level warning is valid. It may only produce a result after a full operating cycle.
That means an oil-level menu can be present while the current reading remains unavailable. Starting the engine may not be enough if the system also needs a proper drive cycle.
What is a static electronic check?
A static electronic check measures with the ignition on and the engine off. The controller may take several seconds to complete the measurement.
This method works only if the manufacturer calibrated the system for static readings. If the display asks you to start the engine, follow that instruction.
What is a dynamic electronic check?
A dynamic electronic check requires the engine to run through a prescribed warm-up cycle. The system may use a specific idle speed, temperature, or drive period.
The cycle matters. Ending it early may leave no valid reading, even if the engine feels warm from a previous trip.
Is an oil-life monitor an oil-level gauge?
No. An oil-life monitor estimates remaining useful oil life. It does not show the current quantity of oil in the sump.
A vehicle can show high oil life and low oil at the same time. It can also show low remaining life with a perfectly normal level.
Treat the two messages separately:
- Oil level tells you whether to add oil now.
- Oil life tells you when to schedule service.
Is an oil-pressure sensor always an oil-level sensor?
No. An oil-pressure sensor confirms that pressure is present. It does not necessarily measure the exact quantity in the sump.
Some control systems use pressure-related data to estimate level. That estimate becomes valid only after the engine has operated long enough.
A low-pressure warning remains a separate issue. A normal level doesn’t prove the pump or pressure system is healthy.
How do you find the procedure for your exact vehicle?
Use the model year, engine, transmission, and VIN to identify the correct manual. Mid-year changes and market differences can affect the procedure.
Then search the manual for these phrases:
- Checking engine oil level
- Engine oil dipstick
- Engine oil level
- Oil pressure
- Maintenance
Record the required engine state, warm-up cycle, shutdown wait, selector position, and display sequence.
Official manufacturer portals are the best place to start. Ford Owner Manuals provides model-specific documents, while Toyota Owners provides maintenance information for supported Toyota vehicles.
Use the equivalent official portal for your manufacturer. Don’t rely on a forum answer for a different engine or model year.
Cold Check vs. Warm Check vs. Running-Engine Check
The best check is the one required by your owner’s manual. Neither cold nor warm is universally correct.
| Check type | Best when the manual specifies it | Main advantage | Main caution |
|---|---|---|---|
| Cold engine off | A check before startup after the vehicle rests | Oil has settled and hot parts can be avoided | Wrong for some dipsticks and electronic systems |
| Warm engine off | A full warm-up followed by shutdown and a specified wait | Oil circulates before the level settles | Hot parts and a strict waiting period |
| Running engine | The dipstick or sensor is calibrated under dynamic conditions | Measures during active circulation | Hot moving parts and exact operating steps |
| Static electronic | Ignition on with the engine off | Usually quick and simple | May be unavailable until a valid measurement exists |
| Dynamic electronic | Engine running through a specified cycle | Uses warmed oil and operating data | The full cycle must be completed |
Cold engine-off checks
A cold check is correct only when the manufacturer allows it. Park on level ground, secure the vehicle, and read the dipstick before starting the engine after a long rest.
A cold reading can provide a useful baseline for spotting later oil loss. Keep using the same cold method if the manual permits it.
Cold doesn’t automatically mean accurate. A dipstick designed for a hot reading may not produce a calibrated cold result.
Warm engine-off checks
A warm engine-off check begins with the prescribed warm-up. Shut down the engine, wait for the stated period, and then read the dipstick.
This method accounts for oil circulating through a warmed engine and then settling. It is common because it can provide a repeatable operating-temperature result.
The shutdown wait is part of the measurement. Skipping it can make the oil appear lower than it really is.
Running-engine checks
A running-engine check is valid only for a vehicle designed for that procedure. The manual may call for a warmed engine, park or neutral, the parking brake, and a specified idle speed.
Some procedures direct you to remove and reinsert the dipstick while the engine runs. Others use a fixed operating condition or a complete display cycle.
Don’t improvise this method. Running the engine can expose you to hot oil, exhaust, belts, pulleys, and cooling fans.
Static electronic checks
A static electronic check keeps the engine off with the ignition on. Open the required menu and wait for the system to complete its measurement.
If the vehicle requests engine operation, don’t force a static result. The system may need temperature or pressure data before it can show a level.
Dynamic electronic checks
A dynamic electronic check follows the dashboard or owner’s manual sequence. The engine may need to warm at idle or complete a specified drive cycle.
Keep the engine at the stated speed and temperature. Don’t accelerate hard or cut the cycle short.
Which method should you use for future comparisons?
Use the same approved method each time. Consistency matters more than choosing the method that produces the highest reading.
Record these details with every check:
- Date
- Odometer reading
- Cold or warm engine
- Engine running or shut down
- Minutes since shutdown
- Oil quantity added
A warm reading immediately after driving and a cold reading before startup may look different. That doesn’t necessarily mean the engine lost oil.
Which check fits each situation?
| Situation | Best approach |
|---|---|
| Before the first drive of the day | Use a cold check only if permitted |
| After a long highway drive | Complete the required shutdown wait or electronic cycle |
| After an oil change | Follow the service instructions and recheck |
| Repeated short trips | Use the manual’s routine schedule and keep records |
| After a low-oil warning | Shut down safely and use the specified method |
| Comparing readings over time | Keep the engine state and procedure consistent |
How to Check Engine Oil with a Dipstick
Once you’ve chosen the approved engine state, the dipstick method is straightforward. Accuracy depends on using the correct dipstick and repeating the same steps.
What tools do you need?
You need the correct owner’s manual, a clean lint-free rag, and approved engine oil if the level is low.
| Item | Purpose | Important detail |
|---|---|---|
| Model-year owner’s manual | Identifies the correct procedure | Match the engine and market |
| Lint-free rag | Removes oil from the dipstick | Avoid grit or loose fibers |
| Approved engine oil | Replenishes the level when needed | Meet the full manual specification |
| Level parking surface | Produces a repeatable reading | Avoid steep driveways |
| Flashlight | Locates the dipstick and filler cap | Check before touching hot parts |
How do you prepare the vehicle?
Park on level ground, apply the parking brake, and set the transmission as required. Switch the ignition off unless the manual calls for a running-engine check.
Let hot oil caps and engine covers cool before touching them. A recently driven engine can be hot enough to cause a serious burn.
For a warm engine-off check, complete the prescribed warm-up first. For a cold check, inspect the dipstick before startup after the vehicle has rested.
Which dipstick should you use?
Use only the engine oil dipstick identified for your exact vehicle.
Some vehicles have several service points. A second dipstick may measure transmission fluid, a separate oil sump, or another lubrication system.
Pulling the wrong one wastes time and gives you a meaningless result. A transmission dipstick also uses a different fluid and scale.
If you can’t identify the correct dipstick, check the manual before pulling anything. A VIN-based manual or manufacturer service department can confirm it.
What should you notice on the first pull?
Pull the dipstick and look at the blade, handle, and tube seal before wiping it.
Look for a damaged handle, a bent blade, pooled oil around the base, or a loose tube seal. These issues can affect the reading or indicate a small leak.
Notice any large metal particles, heavy sludge, or milky residue. A dipstick can reveal visible contamination, but it cannot diagnose oil condition by itself.
How do you wipe and reinsert it?
Wipe both sides of the blade clean. Insert the dipstick fully, then remove it again before reading.
Some handles have a locking tab or twist mechanism. Follow the manual if the dipstick doesn’t seat normally.
Push the blade to its designed stop. A partial insertion can expose the dipstick tube to airflow and distort the oil level.
Keep oily fingers away from the wiped blade. Oil transferred from your hands can create a false-high reading.
How do you read the dipstick correctly?
Hold the blade upright near its marked end. Read the oil at the lower edge shown in the owner’s manual.
Don’t use a random splash higher on the blade. Oil film above the calibrated marks isn’t part of the intended reading.
Some dipsticks use two small tabs. Others use a range, shaded section, or textured area. The manual’s illustration defines the relevant level.
How do you interpret MIN, MAX, ADD, and OK?
The oil should be within the manufacturer’s permitted range. That range may be marked MIN to MAX, ADD to MAX, or ADD to OK.
| Marking | How to interpret it |
|---|---|
| Between MIN and MAX | Within the displayed range |
| At MAX or full mark | Do not add more oil |
| Below MIN | Add approved oil and recheck |
| Below ADD | Add oil according to the manual |
| Between ADD and OK | Usually within the accepted range |
| Above MAX | Check for overfilling |
A MIN mark is a lower boundary, not a target. Don’t plan to drive with the level below the required point.
How much oil should you add?
Add enough approved oil to bring the level into the proper range. Recheck before adding more.
If the manual gives a refill quantity, use it as a reference. The dipstick remains the final measuring tool for an engine that already contains oil.
Add smaller amounts when possible. This makes it easier to stop between MIN and MAX.
Never pour oil into the radiator or coolant expansion tank. Use only the engine oil filler neck.
Should you close the hood before rechecking?
Keep the engine off and the vehicle secure while you recheck. Close the hood after the procedure unless the manual requires the engine to keep running.
Secure the oil filler cap afterward. A loose cap can permit leaks or contamination.
If the level remains low after a small addition, investigate the cause. Repeatedly filling the sump can hide a leak or abnormal consumption.
What should you do if the dipstick won’t come out?
Don’t force an unfamiliar or tightly locked handle.
A locking feature may require a specific pull or twist. Forcing it can bend the dipstick or damage the tube seal.
Consult the manual and confirm that you’re using the engine oil dipstick. If it still resists, have a qualified technician inspect it.
How do you make future checks more useful?
Repeat the same approved method and record the conditions. Track gradual changes instead of relying on one reading.
A steady level supports normal oil use. A repeated decline suggests a leak, consumption issue, or measurement problem.
If the dipstick is loose, damaged, or surrounded by fresh oil, have the tube and seal checked. Don’t trust a compromised reading.
How to Check Engine Oil Using the Electronic System
Electronic oil-level checks are best when the engine and display meet the manufacturer’s calibration conditions.
Is an electronic reading exact?
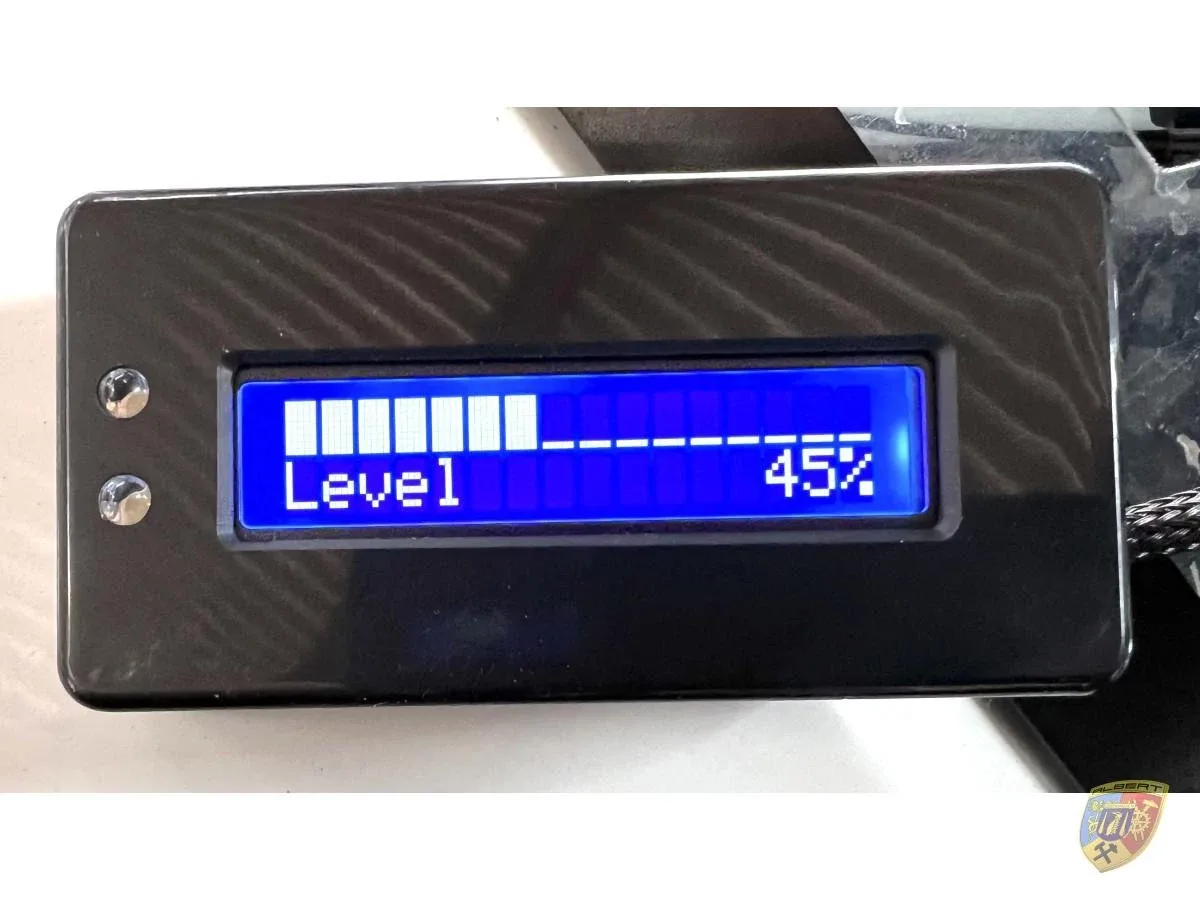
An electronic reading is usually a range or estimate. It is not an exact measurement of the remaining oil in the engine.
Some systems use a direct sensor near the sump. Others estimate level from several operating signals.
The display may show normal, low, critical, unavailable, or a bar graph. It may not show the same precision as a dipstick.
What should you check before using the electronic menu?
Confirm that the menu shows engine oil level. It may instead show oil pressure, oil temperature, or oil-life information.
Check the owner’s manual for the required ignition state, engine state, and warm-up cycle. Then park on level ground and secure the vehicle.
Some vehicles offer both a dipstick and an electronic display. The manual may still require a dipstick for a precise owner check.
How do you perform a static electronic check?
A static electronic check uses the ignition on and the engine off unless the manual says otherwise.
- Park on level ground.
- Apply the parking brake.
- Select park or neutral as directed.
- Switch the ignition on without starting the engine.
- Open the engine oil level menu.
- Wait for the measurement to complete.
- Read the available range or message.
Don’t tap through menus while the system is measuring. If the display says the engine must run, follow that instruction.
How do you perform a dynamic electronic check?
A dynamic electronic check requires the engine to complete the exact warm-up cycle shown by the vehicle.
- Secure the vehicle with the parking brake.
- Start the engine in the required selector position.
- Open the oil-level menu if instructed.
- Allow the engine to reach the stated temperature.
- Keep the engine at the specified idle or speed.
- Wait for the measurement to complete.
- Read the result.
- Shut down safely when the procedure ends.
Some systems need a complete drive cycle before the menu becomes available. Don’t replace that drive with a long idle unless the manual allows it.
What do common electronic messages mean?
Electronic messages describe the system’s current state. The exact wording varies by manufacturer.
| Display message or state | Likely meaning | Correct response |
|---|---|---|
| Oil level normal | The estimate is within range | No addition based on level alone |
| Oil level low | The system crossed a low threshold | Shut down and check as directed |
| Check engine oil | A reading or warning needs attention | Follow the manual’s verification step |
| Measurement unavailable | Required conditions haven’t been met | Complete the warm-up cycle |
| Engine must be running | Dynamic measurement is required | Follow the running procedure |
| Engine must be off | Static measurement is required | Shut down without starting |
| Sensor fault | A circuit or component fault is detected | Arrange diagnostic service |
| Oil-pressure warning | Pressure is outside its expected range | Shut down promptly |
Read the owner’s manual for the exact symbol and color. Don’t assume every amber oil icon means the same thing.
Should you recheck the electronic reading after adding oil?
Recheck it if the manual requires a new measurement cycle. Some systems update after a short drive, while others need the ignition off for a set period.
The controller may not respond immediately to a top-up. A warning that stays on for a few minutes doesn’t always mean the addition failed.
If the vehicle provides a dipstick for verification, use the correct procedure after the specified reset or settling time.
Can the electronic display disagree with the dipstick?
Yes. Different engine states, incomplete cycles, sensor faults, and dipstick mistakes can produce conflicting results.
First, confirm that both methods followed their approved procedures. Don’t compare an electronic warm reading with a dipstick pulled before startup.
If the conflict remains, have the sensor, control module, dipstick, and oil-consumption pattern checked. Don’t assume the electronic value is exact or the dipstick is wrong.
Does an oil-life percentage show the oil quantity?
No. Oil life estimates remaining useful service. It does not show whether the engine has enough oil right now.
A high oil-life percentage can appear with low oil. A low percentage can appear with a perfectly normal level.
Schedule service when the oil-life reminder calls for it. Inspect the level separately when the vehicle’s procedure requires a check.
When Does the Engine Need to Be Running?
The engine needs to run only when the owner’s manual specifically requires a running check.
Running the engine doesn’t automatically make the reading more accurate. Some systems need circulation, temperature, or pressure data. Others must be measured with the engine off.
Why does a manufacturer require a running check?
A running check can stabilize oil around a sensor or inside a calibrated dipstick tube.
The engine also supplies oil temperature and pressure data. A controller may need those values before it will show a level.
Some dipsticks are calibrated at a particular idle speed. Oil splashing at that speed creates the intended reading.
That design is model-specific. Running the engine on a vehicle meant for a shut-down check can produce an invalid result.
What are the common running-check formats?
Running checks usually fall into one of three formats.
| Format | What happens | When to read |
|---|---|---|
| Warm idle dipstick | Engine warms and idles | At the specified running moment |
| Dynamic electronic menu | Engine completes a warm-up cycle | When the display confirms a valid reading |
| Drive-and-menu cycle | Vehicle completes a prescribed drive | When the oil screen becomes available |
A drive-and-menu cycle may call for a certain amount of road driving. It may also require a specific engine speed or temperature.
Follow those conditions exactly. Don’t accelerate hard to create data the system never intended to use.
How do you perform a running-engine dipstick check?
Use this sequence only if the manual directs you to read the dipstick while the engine runs.
- Park outdoors on level ground.
- Apply the parking brake.
- Select park or neutral as specified.
- Start the engine and reach the required idle.
- Allow the engine and oil to meet the stated condition.
- Remove and wipe the dipstick.
- Reinsert it fully.
- Pull it again at the specified moment.
- Read the calibrated range.
- Shut down safely.
Some systems require several pull-and-check cycles. Follow the full sequence rather than improvising one.
How do you perform a running electronic check?
Follow the dashboard cycle without rushing or changing the operating conditions. Start the engine, select the required menu, and let the system warm through its cycle.
Watch for temperature, pressure, or measurement prompts. The display may cycle through several idle or speed stages.
Complete the entire cycle before shutting down. An interrupted cycle may leave no useful reading in the system.
Is high idle or revving ever appropriate?
No. Use only the idle or engine speed stated in the owner’s manual.
Revving can raise oil splash inside the dipstick tube. It also increases the danger around belts, pulleys, and cooling fans.
A running check is a controlled measurement. It is not a performance test or a way to warm up the engine aggressively.
What if the engine never reaches the required temperature?
Complete the prescribed drive or warm-up cycle under normal conditions. Don’t force the engine into overheating.
Cold weather can lengthen warm-up. A long idle may also warm coolant faster than oil on some engines.
If the required cycle cannot finish, the display may remain unavailable. Use an approved alternative only if the manual provides one.
What if an oil-pressure warning appears?
Shut down safely and follow the owner’s manual. Don’t keep running the engine to complete a level check.
Once the vehicle is safe, inspect the oil using the correct procedure. If the level is adequate, the pressure problem may still exist.
A correct level doesn’t prove that the pump, filter, passages, or pressure sensor is working.
Common Oil-Check Mistakes That Lead to Bad Readings
Most oil-reading errors come from wrong timing, wrong technique, or confusing oil level with another warning.
Is a cold dipstick reading always correct?
No. A cold dipstick reading is valid only when the manufacturer calibrated that dipstick for a cold, engine-off check.
Some vehicles allow this method before the first start of the day. Others require the engine to warm and circulate oil first.
The dipstick’s length, angle, and measuring position are designed around one procedure. A similar engine may use a different method.
What is the most common timing error?
Pulling the dipstick immediately after shutdown is a common timing error. Oil is still returning to the sump, so the reading can be falsely low.
A false-low result may cause unnecessary filling. It can also hide a genuine consumption problem by making the engine seem to need repeated top-ups.
Complete the manual’s shutdown wait before reading.
Why does an incomplete insertion distort the result?
An incomplete insertion leaves part of the dipstick tube open to air. It also changes how much oil the blade contacts.
The result may be lower, higher, or inconsistent between readings. Push the dipstick fully to its designed stop every time.
Can oil on the handle change the reading?
Yes. Oil on the handle can transfer onto the wiped blade and create a false-high reading.
A loose dipstick can also carry oil down the outside of the tube. Wipe carefully and check the handle and tube seal if they remain oily.
Does a sloped driveway matter?
Yes. Oil can pool toward one side of the sump on a slope. The dipstick may then show a result that doesn’t represent the sump’s average level.
Use the flattest safe parking area available. Don’t check beside traffic or where the vehicle could roll.
Can a splash above the dipstick tip cause overfilling?
Yes. Oil splash can leave a thin film above the calibrated marks.
Read the oil at the lower edge shown by the manual. Don’t use a random wet streak higher on the blade.
Are all engine compartments easy to identify?
No. The oil filler cap may sit beside the coolant cap, brake-fluid reservoir, or a covered service port.
Use the label and manual illustration. Never remove a hot surge tank or expansion tank during an oil check.
Can you use any oil for a small top-up?
No. A small top-up still needs the required viscosity and quality specification.
A 0W-20 label alone doesn’t prove compatibility. The oil may also need to meet an API, ACEA, or manufacturer approval requirement.
Use the exact specification listed for your engine.
Can additives fix a low reading?
No. Additives don’t replace the required amount of oil. Some can alter viscosity, compatibility, or deposit control.
Pouring detergent or thickener into a low sump can make the result harder to diagnose. Mechanical faults still require proper testing.
Does turning the key on start an electronic check?
No. The ignition being on doesn’t always start a level measurement.
You may need to open a specific menu, wait for a sensor signal, or complete a full warm engine cycle. Follow the display sequence.
Does topping up reset the oil-life monitor?
Usually, a small owner top-up doesn’t reset the oil-life monitor. A complete oil-change service may reset it according to the vehicle’s procedure.
Don’t reset the monitor to silence a low-level message. Quantity and remaining oil life are separate measurements.
What should you do if a reading still doesn’t make sense?
Repeat the check once using the same approved conditions. Verify the dipstick, engine state, parking surface, and oil specification.
If the result remains implausible, contact a dealer or qualified service department. Give them the VIN, reading, mileage, and exact conditions.
A wrong reading wastes oil. A dismissed genuine low level can cause much greater damage.
Low-Oil Warnings, Oil Consumption, and Leaks
A low-oil warning calls for a safe shutdown and a correct level check. A low-oil-pressure warning calls for faster protective action.
The symbols may look similar, but they represent different risks.
What should you do when a low-oil warning appears?
Pull over somewhere safe, reduce load gently, and stop driving. Shut down the engine and follow the manual for the specific warning.
Inspect the level using the specified dipstick or electronic procedure. Add approved oil only if the manual allows you to continue after a proper top-up.
Don’t use a long trip to test whether the warning will clear.
Is a low-oil warning the same as low oil pressure?
No. A low-oil warning concerns quantity. A low-oil-pressure warning means the lubrication system isn’t maintaining the expected pressure.
| Warning | What it represents | Immediate action |
|---|---|---|
| Low engine oil | Estimated level below a programmed range | Shut down safely and check the quantity |
| Add oil | A direct or estimated level needs replenishment | Add approved oil and recheck |
| Low oil pressure | Pressure is below the expected range | Shut down promptly |
| Oil-pressure sensor fault | The system cannot confirm pressure | Arrange prompt diagnostic service |
| High oil temperature | Oil is outside its preferred temperature | Stop sustained high-load driving |
| Change engine oil | Remaining useful oil life is low | Schedule the specified service |
A pressure warning should not be cancelled by a normal dipstick reading.
Can low pressure occur with a normal oil level?
Yes. A normal quantity doesn’t confirm that the oil pump or pressure system is working.
Possible causes include a failed pressure sensor, a clogged filter, an internal leak, fuel dilution, or another lubrication fault.
Have a sustained pressure problem diagnosed rather than repeatedly restarting the engine.
How much oil consumption is normal?
Normal consumption depends on the engine, model year, manufacturer, and engine condition. Your owner’s manual is the proper reference.
Some manufacturers publish a maximum consumption rate. Some also state a warranty threshold that may differ from a general maintenance limit.
There is no single universal amount that applies to every engine. Don’t assume a measured rate is acceptable without checking your vehicle’s documentation.
How do you calculate oil consumption?
For US measurements, divide the oil added in US quarts by the miles driven. Multiply that result by 1,000.
[
\text{Consumption rate} =
\frac{\text{US quarts added}}{\text{miles driven}} \times 1,000
]
For metric use, divide litres added by kilometres driven and multiply by 1,000.
Example: You add 0.5 US quart at 41,000 miles. At 43,000 miles, you add another 0.5 US quart.
That equals 1 US quart over 2,000 miles, or 0.5 US quart per 1,000 miles. This is a calculation example, not a universal normal figure.
Compare the result with the manufacturer’s stated limit. Measure the oil added rather than estimating it from an unmarked bottle.
What can cause higher oil consumption?
Worn piston rings, valve stem seals, and cylinder-wall wear can allow oil into the combustion process.
Turbocharged engines may consume oil through several sealing and lubrication surfaces. Older engines may consume more as seals age.
Driving style affects the measurements you collect, but it does not repair worn components. Frequent short trips can also hide a gradual decline.
Where do external engine oil leaks appear?
External leaks often collect under the vehicle, along a frame rail, or near a wheel.
| Possible source | Common sign |
|---|---|
| Oil filter or filter housing gasket | Oil around the filter or housing |
| Oil-pan drain plug | Oil near the drain plug |
| Oil-pan gasket | Streaking along the pan edge |
| Valve-cover gasket or cap | Oil near the top of the engine |
| Front crankcase seal | Oil near the crankcase and pulley area |
| Rear main seal | Oil near the transmission housing |
| Dipstick tube or O-ring | Oil around the tube or handle |
| Oil-cooler line or fitting | Oil near a wet connection |
The exact layout depends on the engine. Fresh oil is usually easier to identify than old, dusty residue.
How do you check for a leak after the engine warms up?
Park overnight, then inspect underneath the vehicle before starting it. Oil that forms while parked may become visible overnight.
Look for fresh oil on the pavement, undertray, subframe, or transmission housing. Then inspect the common source points.
Some leaks appear only when the engine is hot and pressurized. Let hot components cool before placing your hands nearby.
What if there is no visible oil underneath?
No visible leak doesn’t prove the engine doesn’t consume oil. Internal leaks can carry oil into the combustion chamber without leaving a large external trail.
Oil can also disappear through evaporation as engine seals age. A small change may take several months to become obvious.
If measured consumption exceeds the manufacturer’s limit, testing is still needed.
Could the engine be burning oil?
Yes. A visible blue exhaust plume can indicate engine oil entering the combustion process.
A faint blue haze may be harder to see in bright light. No obvious smoke doesn’t rule out oil consumption.
Fuel injector leakage and other faults can also cause smoke. Diagnosis needs testing rather than guesswork.
What if the level changes for another reason?
Fuel dilution, coolant contamination, evaporation, and measurement errors can all affect the observed level.
Fuel dilution can raise the measured quantity while reducing oil viscosity. Coolant loss can lower the level and contaminate the oil.
A fuel smell, milky residue, or visible contamination needs service. Don’t diagnose it from the dipstick alone.
When is a sudden drop in oil serious?
A sudden, large drop is serious because the engine may already have less oil than its lubrication system needs.
Don’t keep adding oil if the sump empties again after a short distance. That can hide a leak or mechanical failure.
Arrange transportation or towing when continued running would be unsafe.
What should you take to a service appointment?
Record the date, odometer reading, measured quantity added, and exact warning messages. Note whether the engine was cold or warm.
Photograph fresh oil spots before cleaning them. That gives the technician useful evidence of location and pattern.
Accurate refill records often narrow a consumption diagnosis faster than a general statement that the engine uses oil.
Safety Rules for Checking and Adding Engine Oil
Checking engine oil is simple, but hot oil and moving parts can turn a quick task into an injury.
What should you do before touching the engine?
Park on level ground, apply the parking brake, and set the transmission as required. Switch the ignition off unless the manual requires engine operation.
- Let hot oil caps, exhaust parts, and covers cool.
- Remove jewelry, loose clothing, and anything that could snag.
- Use a bright flashlight before touching the engine bay.
- Keep children and pets away.
- Keep a lint-free rag and waste container nearby.
Treat the engine bay as active machinery. A cooling fan can operate after the engine shuts down.
Why can a hot oil cap burn you?
Engine oil can be hot enough to cause serious burns. Oil may splash onto your hand when the cap or dipstick is removed.
Hot oil can also expose you to burning metal and hot exhaust components. Wait until the service points are safe to touch.
Don’t use a rag as extra protection for the cap. It can catch fire against a very hot or oily surface.
When is a running-engine check safe?
Perform a required running check outdoors. Never run a combustion engine in a closed garage.
Carbon monoxide can build up quickly and may be odorless. If a garage is the only location available, keep the door fully open and use extreme caution. Outdoors is safer.
Keep the transmission in park or neutral, as directed. Apply the parking brake and stay clear of belts, pulleys, and fans.
Keep the engine cover installed unless the manual requires removal. Some vehicles may also restart automatically.
What protective equipment should you use?
Safety glasses, disposable gloves, and a lint-free rag are sensible safeguards. Gloves reduce skin contact but can slip near a moving engine.
Use a container that stands upright. A narrow bottle or open jug makes spills more likely.
If oil touches your skin, wash it with soap and water. Rinse oil from your eyes with clean water and seek medical advice if irritation continues.
How do you add oil safely?
Use only oil that meets the owner’s manual specification. Add it slowly and in small amounts.
Keep the container away from hot components. Don’t let it touch the filler neck, and don’t pour through the radiator or coolant tank.
Stop before reaching MAX. The full mark is a limit, not a target.
Recheck the level after filling. If the manual requires a new electronic cycle, complete it before judging the result.
Why can overfilling cause problems?
An overfilled engine can aerate the oil and create foam. Foam can reduce lubrication stability and contribute to unstable pressure.
Excess oil can raise crankcase pressure. That pressure may increase leakage through seals or send oil mist toward hot emissions components.
A loose or leaking oil cap can add to the problem. Secure it after filling.
What should you do if oil spills?
Shut down the engine and let hot oil cool before approaching the spill. Move the vehicle only if it’s safe to do so.
Contain the oil with absorbent material. Don’t wash a large spill into a storm drain, sewer, or onto the ground.
Put used oil and oily rags into a sealed container. Take them to an approved collection point or recycling facility.
Oily rags can hold enough oil and heat to burn. Keep them away from flames, heaters, and sparks.
Which conditions should stop a routine check?
A pressure warning, burning smell, major leak, or rapidly falling level should stop the check immediately.
Shut down safely and follow the owner’s manual. Don’t restart repeatedly to see whether a warning clears.
If oil is leaking onto a hot exhaust, allow it to cool before approaching. A fire can develop if the oil catches.
When to Check Oil in Real-World Situations
The right moment depends on what the vehicle has just done and what you need to learn.
When should I check before a long drive?
Check before departure if the last inspection was missed or the vehicle has been idle for several days. Also check before a long trip if the engine consumes oil or has an unresolved low reading.
Use the approved procedure for your vehicle. A reading immediately after a long drive may be invalid if the manual requires a shutdown wait.
Address any low-oil or low-pressure warning before leaving.
Why do short trips deserve special attention?
Short trips can prevent the engine and oil from reaching full operating temperature. Fuel dilution may occur on some gasoline engines driven repeatedly below operating temperature.
Fuel can lower oil viscosity and change the quantity seen on the dipstick. The effect depends on the engine and how the vehicle is used.
Use the manual’s inspection schedule. A regular check can help reveal a downward trend when warm readings are rare.
What should I do after an oil change?
Complete the service instructions and verify the level using the specified dipstick or electronic procedure.
Inspect the filter, drain plug, oil pan, and filler cap for fresh leakage. Record the odometer reading, oil quantity, filter, and any service reset.
If the oil-change indicator remains active, follow the full service procedure rather than assuming the quantity is wrong.
How should I check a used vehicle before buying it?
Inspect the oil before startup only if the manufacturer allows a cold check. Then examine the engine bay and area beneath the vehicle.
Look for a consistent level, fresh leaks, heavy sludge, fuel dilution, or large metal particles. None of these findings identifies the cause by itself.
Ask for service records, recent oil changes, pressure repairs, and major leak work. A clean oil cap doesn’t prove regular service.
What changes in hot or cold weather?
The checking procedure doesn’t change with weather. The time needed to reach the required engine condition can change.
In cold weather, a cold overnight check may be convenient if permitted. Allow more time for a full electronic warm-up.
In hot weather, let the oil cap, dipstick, and nearby parts cool. Check before a long drive rather than immediately after a hot highway run.
Use oil that meets the full manual specification for the vehicle and climate.
What about towing and sustained highway driving?
Check the oil before heavy towing, long climbs, or sustained high-load driving. Use the specified oil and don’t add extra above MAX.
High-load operation increases lubrication demand. Watch the oil-pressure and oil-temperature warnings during the trip.
Shut down promptly if a pressure warning appears. A full sump doesn’t protect the engine from a lubrication fault.
What should I check after long storage?
Inspect beneath the vehicle and inside the engine bay before starting a vehicle stored for weeks or months. Look for oil, coolant, fuel, and other leaks.
Follow the manual’s storage procedure. Some vehicles call for a fuel stabilizer, battery maintainer, or special start sequence.
Don’t repeatedly idle a stored engine to clear a message. Short starts may create condensation, and the controller may need a proper drive cycle.
Which approach fits each situation?
| Situation | Recommended approach | Avoid |
|---|---|---|
| Before a long trip | Check within the manual’s schedule and before departure | Leaving with an unresolved warning |
| Repeated short trips | Keep regular records using one approved method | Comparing unlike cold and warm readings |
| After an oil change | Complete the service cycle and recheck | Assuming the reminder proves quantity |
| Before buying a used car | Inspect cold if allowed, then inspect leaks and records | Ignoring pressure warnings |
| Hot or cold climate | Reach the specified engine condition safely | Guessing from ambient temperature |
| After long storage | Inspect before startup and follow the manual | Repeatedly idling to clear a message |
| Heavy towing or highway use | Check before the trip and monitor warnings | Adding oil above MAX |
Oil-Level Ranges, Check Intervals, and Other Useful Data
Oil-level data is useful only when you record the conditions around the reading. Capacity, viscosity, range, and consumption each serve a different purpose.
What do MIN, MAX, ADD, and OK mean?
MIN and MAX define a displayed range. ADD marks a point where oil may need replenishment. OK usually identifies an accepted range.
| Marking | Meaning |
|---|---|
| MIN | Lowest displayed boundary |
| MAX | Upper limit that should not be exceeded |
| ADD | Point at which oil should be added |
| OK | Level accepted for normal operation |
| Full | Calibrated upper point |
| Shaded area | May identify a permitted range on some dipsticks |
The owner’s manual defines the exact interpretation. Don’t assume every mark on the blade is part of the normal range.
Why are engine capacity and top-up amount different?
Engine oil capacity is the total amount held by the lubrication system. A top-up amount is what you add between readings.
A manual may state a capacity such as several US quarts with the filter installed. That number doesn’t tell you how much to add to an engine that already contains oil.
The dipstick or electronic display determines the current quantity. Add oil until it sits within the required range.
How do viscosity and oil specifications work?
Oil viscosity describes how the oil flows at specified test temperatures. A quality specification describes required performance.
SAE J300 viscosity grades include 0W-20, 5W-30, and 10W-40. The first number describes cold-temperature behavior. The second describes behavior at a higher test temperature.
The viscosity grade alone doesn’t prove compatibility. API, ACEA, or manufacturer approval requirements may also apply.
| Label or specification | What it describes | What it does not prove |
|---|---|---|
| SAE viscosity grade | Flow behavior at test temperatures | Compatibility or long-term protection |
| API category | Performance under a specified testing program | Approval for every vehicle |
| ACEA category | European performance requirements | Manufacturer-specific approval |
| Manufacturer approval | Compatibility with a defined engine family | Correct oil level or proper quantity |
| Oil color | General appearance and contamination clues | Exact condition or remaining life |
Which units should you use?
Use the units shown in the manual and oil container. A US quart and an imperial quart are different amounts.
| Unit | Approximate metric equivalent |
|---|---|
| 1 US fluid ounce | 29.6 millilitres |
| 1 US quart | 0.946 litres |
| 1 Imperial fluid ounce | 28.4 millilitres |
| 1 Imperial quart | 1.136 litres |
| 1 litre | 1.057 US quarts |
Don’t estimate quantities by container shape. Use a marked measuring container if you need an accurate refill record.
How often should you check engine oil?
Follow the interval in the owner’s manual. Check sooner if the engine consumes oil, has a known leak, or displays a warning.
If the manual gives no separate owner-check interval, a monthly check can be a practical habit for an older or oil-consuming vehicle. It is not a universal requirement.
Choose a schedule you can repeat. A regular monthly check is more useful than an occasional reading taken at a different temperature each time.
What should you record at each check?
Record enough information to reproduce the reading. A single note such as “good” won’t help later.
| Data point | Why it matters |
|---|---|
| Date | Shows the time between checks |
| Odometer reading | Measures use over distance |
| Engine state | Cold, warm, running, or shut down |
| Shutdown wait | Confirms dipstick repeatability |
| Measured oil added | Supports consumption tracking |
| Visible leaks | Helps identify a developing fault |
| Dashboard messages | Preserves warning history |
Take a clear photograph of an unfamiliar warning. Preserve the exact wording for a technician.
How can you use a trend instead of one reading?
Compare several readings taken with the same approved method. A gradual decline matters more than one result after a long drive.
Keep the parking surface, engine state, and wait time consistent. Mark any change in method.
Measure each top-up rather than guessing. If the level falls quickly, stop treating the situation as routine maintenance.
Do pressure and temperature values vary by vehicle?
Yes. Oil pressure depends on engine speed, viscosity, temperature, and lubrication-system design.
Oil pressure can change as the engine warms or idles. A manual may specify a minimum pressure at a particular operating condition.
There is no single safe pressure or oil temperature for every engine. Don’t copy a gauge value from another vehicle.
Can regional models use different procedures?
Yes. Regional models may use different engines, oil specifications, dipsticks, and display systems under the same model name.
US and UK documentation may also use different units. Production dates can matter when a procedure changes mid-year.
Use the model year, engine, transmission, VIN, and market when requesting documentation.
Which numbers should never be treated as universal?
Do not apply another vehicle’s oil capacity, viscosity, pressure, or consumption limit to yours.
Similar-looking engines may use different dipstick calibrations and electronic controls. Close is not good enough for a lubrication system.
Use the documentation issued for the exact vehicle.
Frequently Asked Questions About Checking Engine Oil
Should I check engine oil before starting the car?
For many vehicles, yes, but only when the owner’s manual allows a cold, engine-off check. Park on level ground, secure the vehicle, pull and wipe the dipstick, then reinsert and read it. If the manual requires a warm or running check, a before-start reading may not be valid.
Is it better to check oil when the engine is cold or warm?
Neither temperature is universally better. The manual decides whether the dipstick or electronic system was calibrated for a cold check, a warmed engine-off check, or a running-engine check. Use that method consistently when comparing readings over time.
How long should I wait after turning the engine off?
Follow the exact waiting period in the owner’s manual. About five minutes is common on some vehicles, but it is not a universal rule. Pulling the dipstick too early can produce a falsely low reading because oil is still draining toward the sump.
Can I check oil with the engine running?
Only if the owner’s manual specifically requires a running-engine procedure. Perform it outdoors on level ground with the parking brake applied. Keep clear of belts, fans, and hot exhaust, then follow the specified idle or warm-up conditions exactly.
How often should I check engine oil?
Use the interval in the owner’s manual, and check sooner if the engine consumes oil, has a leak, or displays a warning. A monthly check can be useful for an older vehicle, but it is an added habit rather than a universal requirement. Record the odometer reading with each check.
Is it bad to add too much engine oil?
Yes, overfilling can aerate the oil, increase crankcase pressure, cause leakage, and sendoil mist toward hot exhaust components. Add only the specified oil, stop at the maximum mark, and recheck the level.
Final Decision Guide: Choose the Right Check for Your Vehicle
The reliable choice comes from the owner’s manual for your exact vehicle. Follow the branch for your measurement system, then interpret the result before adding oil.
What is the shortest reliable decision process?
Use this sequence whenever you need a measurement.
- Identify the model year, engine, transmission, and VIN.
- Find the owner’s manual issued for that configuration.
- Decide whether it requires a cold, warm, engine-off, or running check.
- Note any warm-up cycle, shutdown wait, idle speed, or selector position.
- Park on level ground and secure the vehicle.
- Perform the specified dipstick or electronic procedure.
- Compare the result with MIN, MAX, ADD, OK, or the electronic range.
- Add only approved oil if needed, then recheck.
- Record the reading and investigate repeated declines or warnings.
Which branch should you take?
| What the manual says | What you do | What you expect |
|---|---|---|
| Check before starting | Read the dipstick after an overnight rest | A cold, engine-off level |
| Check with the engine off after warming | Run or drive as directed, shut down, and wait | A settled, warm reading |
| Read the dipstick while running | Follow the exact idle and safety procedure | A dynamic dipstick reading |
| Select the electronic menu with ignition on | Keep the engine off and wait for the display | A static electronic estimate |
| Run the electronic warm-up cycle | Follow the dashboard prompts outdoors | A dynamic electronic estimate |
| Measurement unavailable | Complete the prescribed cycle again | A valid reading or a service fault |
What should you do with the result?
If the level is within range, record it and don’t add oil. If it’s below the required mark, add the specified oil in small amounts and recheck.
If it’s above MAX, stop adding oil and verify the reading. A level above the upper mark can cause aeration, leakage, and oil mist.
If the display remains unavailable, repeat the complete approved cycle. Don’t substitute a random engine speed or an incomplete idle.
If the level drops quickly, has a warning, or leaves fresh oil beneath the vehicle, stop treating it as a routine top-up. Arrange service.
What if the documentation is missing?
Use the manufacturer’s model-specific manual portal or contact a dealer with the VIN. Don’t rely on a forum answer for a different engine or model year.
If you can’t confirm the procedure, don’t run the engine or remove a hot component just to experiment. A short delay is safer than a wrong reading or a burn.
If a dealer needs to identify the system, provide the VIN, engine type, transmission, and dashboard message. A photo of the dipstick location can also help.
What is the final decision rule?
If the manual requires cold, check cold. If it requires warm and engine-off, warm the engine, shut it down, and wait. If it requires running, use the exact running procedure outdoors.
For an electronic system, follow the displayed cycle. For a dipstick, insert it fully and read the calibrated marks. Add only the specified oil, avoid overfilling, and track the result.